Posts mit dem Label Underwear werden angezeigt. Alle Posts anzeigen

Dienstag, 28. November 2017

Darf's mal wieder historisch sein?

Dieses Projekt liegt zwar schon etwas länger zurück, aber was soll's. Kurz vor meinem Geburtstag im April kündigte die Dreamstress für Scroop-Patterns einen Sale an. Da ich schon etwas länger um den Fantail-Skirt herumschlich, nahm ich das als ein Zeichen und bestellte die Vollversion (Jahrhundertwende + 1940er), es soll sich ja auch lohnen.

This project goes a bit further back, but whatever. Shortly before my birthday in April, the Dreamstress announced a sale for Scroop-Patterns. Since I'd had my eye on the Fantail-Skirt for a while even before that, I took it as a sign and ordered the full version (turn of the century + 1940's), to make it worth my while.

Ich habe tatsächlich ein sehr spezifisches Kostüm mit diesem Rock geplant, deshalb habe ich mir die graue Baumwolle gleich im reduzierten 6m Paket von buttinette.de bestellt. 
Ich bin etwas größer als die Durchschnittsfrau, und wollte auf alle Fälle einen bodenlangen Rock (kürzen kann man immer), deshalb habe ich die Schnittmusterstücke gleich um 10cm verlängert.

I'm actually planning a very specific costume to go with this skirt, which is why I ordered the grey cotton as a discounted 6m-bundle from buttinette.de.
I'm a bit taller than the average woman, but wanted very much for the skirt to be floor-length (you can always shorten it later), so I lengthened the pattern-pieces by 10cm right away.

Die Anleitung war gut geschrieben, und das Zusammennähen verlief fast problemlos. Aus irgendeinem Grund war am Ende die Taillenlinie des Rockes 3cm länger als der Bund, was ich durch zwei winzige Falten neben den beiden Front-Nähten behoben habe. Das fällt nicht negativ auf, hat mich aber auf die Idee gebracht, dass ich da Taschen gut hätte verstecken können - und Taschen sind immer praktisch. Naja, vielleicht später noch.

The instructions were very clear, and assembly went off almost without a hitch. For some reason, the waistline of the skirt ended up being 3cm longer than the waistband, but I fixed that with two tiny pleats right next to the two front seams. It doesn't negatively impact the look of the thing, but gave me the idea that those pleats would have been perfect to hide pockets - and pockets are always good to have. Ah well, maybe I'll add some later on.


Der fertige Rock war leider etwas schlaff und traurig, und überhaupt nicht so toll, wie ich ihn mir vorgestellt hatte. Zum Glück habe ich aber oft genug gelesen, dass die Basis bei historischen Kostümen 3/4 des looks ausmacht, und ließ mich davon nicht entmutigen. Am nächsten Tag bin ich zum Ikea gefahren, habe 4 oder 5m weißen Baumwollstoff geholt, und mit dem selben Schnittmuster einen Unterrock genäht. Der Unterrock ist hinten gerafft statt gefaltet, um mehr Volumen zu geben (und weil das einfacher war), und verfügt über eine 7m lange, 35cm breite geraffte Rüsche. Die Rüsche ist mit Maschine versäumt (weil das bei geraden Stoffbahnen am einfachsten ist), und mit Häkelspitze aus dem Ein-Euro-Shop verziert. Die runden Rocksäume sowohl des grauen- als auch des Unterrocks sind von Hand mit Hexenstich gesäumt.


Unfortunately, the finished skirt was a bit limp and sad and not at all as awesome as I had imagined it. Luckily, I've read often enough that in historical costumes, the foundations make or break the look, and wasn't discouraged. The next day I went to Ikea and got 4 or 5m of white cotton and made a petticoat from the same pattern. The petticoat is gathered instead of pleated in the back, to give more volume (and because it's easier to do), and has a 7m long, 35cm deep ruffle. The ruffle is hemmed by machine (because that's easiest to do with long, straight pieces of fabric) and trimmed with crochet-lace from the dollar-store. The rounded hems of both the grey skirt and the petticoat are hemmed by hand with herringbone-stitch. 

Das sieht doch schon viel besser aus, oder?
Das Unterhemd besteht übrigens aus einer gehäkelten Passe und einem Baumwoll-"Schlauch", der durch Biesen vorne und hinten ein wenig in Form gebracht wird, und ist komplett handgemacht. 

Doesn't this look a lot better?
The chemise, by the way, consists of a crochet yoke and a cotton "tube" that is shaped with pintucks in the front and back, and is completely handmade. 


Die Röcke sehen toll aus, und es macht Spaß, mit so viel Stoff um die Beine herum zu laufen. Für das geplante Kostüm fehlt jetzt noch ein Korsett und ein Oberteil, wenn ich das habe, werde ich auch verraten, was das ganze werden soll. Außerdem habe ich mir überlegt, dass der Rock in hellblau mit entsprechendem Oberteil (+ Hemd und Korsett) auch ein sehr tolles Westworld-Kostüm abgeben würde. Muss ich für die Fasnet auf alle Fälle im Kopf behalten.

The skirts (in combination) look fantastic, and it's a lot of fun to walk around with that much fabric swinging around my legs. For the planned costume I still need a corset and a bodice, once I've got that, I'll tell you what it's supposed to be. I also thought that the skirt, in a light blue and with the appropriate bodice (+ the chemise and corset) would make a good Westworld-costume. I have to keep that in mind for the upcoming carnival.


Freitag, 11. September 2015

50's Style Petticoat

Back when I was planning my 50's style dress I knew I also had to have a petticoat to get the look right. I got some tulle out of my mother's stash (in there because we had used it as part of a salt & pepper costume for the both of us some years ago), around 2m x 1,60m. I didn't use any specific tutorial because petticoats are pretty straightforward, but cut the tulle into nine 160cm long strips of around 20cm width and sewed them into tubes (one strip, two strips, and four strips). I gathered these tubes by sewing some yarn to the top edge via zig-zag stitch and tried to sew the gathered biggest tube to the ungathered middle tube - and that's where I ran into trouble. See, getting tulle that has been gathered to half its original lenght to cooperate with a sewing machine can be rather frustrasting - and so into the box the whole thing went. Until last weekend, when I knew I needed a petticoat for my now finished dress!
If you read my previous post, you know that I was already well-adjusted to hand-sewing by then (I watched the documentary "Canada - A People's History" troughout sewing on the dress and petticoat and am currently at episode 13 of 17, with each episode being just short of two hours), plus I really wasn't prepared to give the tulle another try on the machine, so I made myself comfortable on my floor with a blunt needle:
Okay, not watching any movies here, but I got through 3 albums of The Tallest Man On Earth before the biggest tube was connected to the middle!
I useds backstitches to sew all tubes together, using a blunt needle when it was just tulle (why risk stabbing yourself when the fabric you're working with is already full of holes?) and a pointy one to connect the tulle to the linen/cotton top part.
That top part was actually a petticoat I'd made for a halloween costume years ago and that has been sitting in my closet ever since, only once in a blue moon being used underneath a pretty see-through white rtw skirt. It's basically a 1m tube of fabric with two ruffles, but had the perfect length and width (plus was already assembled... I'm lazy, did I already tell you that?), so I attached the tulle right above the lower ruffle - I kinda like the effect it gives.
Here you can see all the layers. Of course the effect on the overall look is greater when I'm actually wearing it, because then it can stand out against my legs instead of a thin wooden collumn... ^^
After wearing it, though, I realized I'd have to make another cotton petticoat to wear underneath that one, because gathered tulle is just - so - itchy! I already have some suitable fabric for that, but haven't started cutting yet. Ah well, if I procrastinate for too long, I'm gonna have to survive an itchy evening, because the next Rockabilly concert is in October! Yay :)


Sonntag, 29. Juni 2014

Bits and pieces

To be honest, I haven't really been sewing much lately. It's not that I didn't have the time, I just wasn't motivated enough to use that time to sew. But I've been doing some prep work, and other little things, that I didn't deem interesting enough to justify a blog post. But since this break is getting kind of long, here's some bits and pieces:

-the circular gallifreyan shirt:
Finished embroidering the collar and halfway attached it to the base of the shirt. Now I'm too lazy to iron it so I can finish attaching it.
attached collar
finished embroidery


- patterns:
I bought a pattern for a vest/waistcoat/gilet (I have no clue what to call it in English), because up until now, I always stole my brother's when I wanted to wear one. I traced the pieces I needed instead of cutting them because I wasn't too sure about the size I needed and didn't want to destroy the paper pattern, so that's as far as I got.
No pictures yet, so you get the pattern envelope. I'll be doing view A first

Also in patterns: I'm still scaling up a 19th century corset pattern, I even have some fabric for it.
enlarging the gussets
 I will be doing full posts when (if) I finish any of these, but right now I'm kind of busy with other things. We'll see how it goes.

Freitag, 28. März 2014

Corset remake / Steampunk!

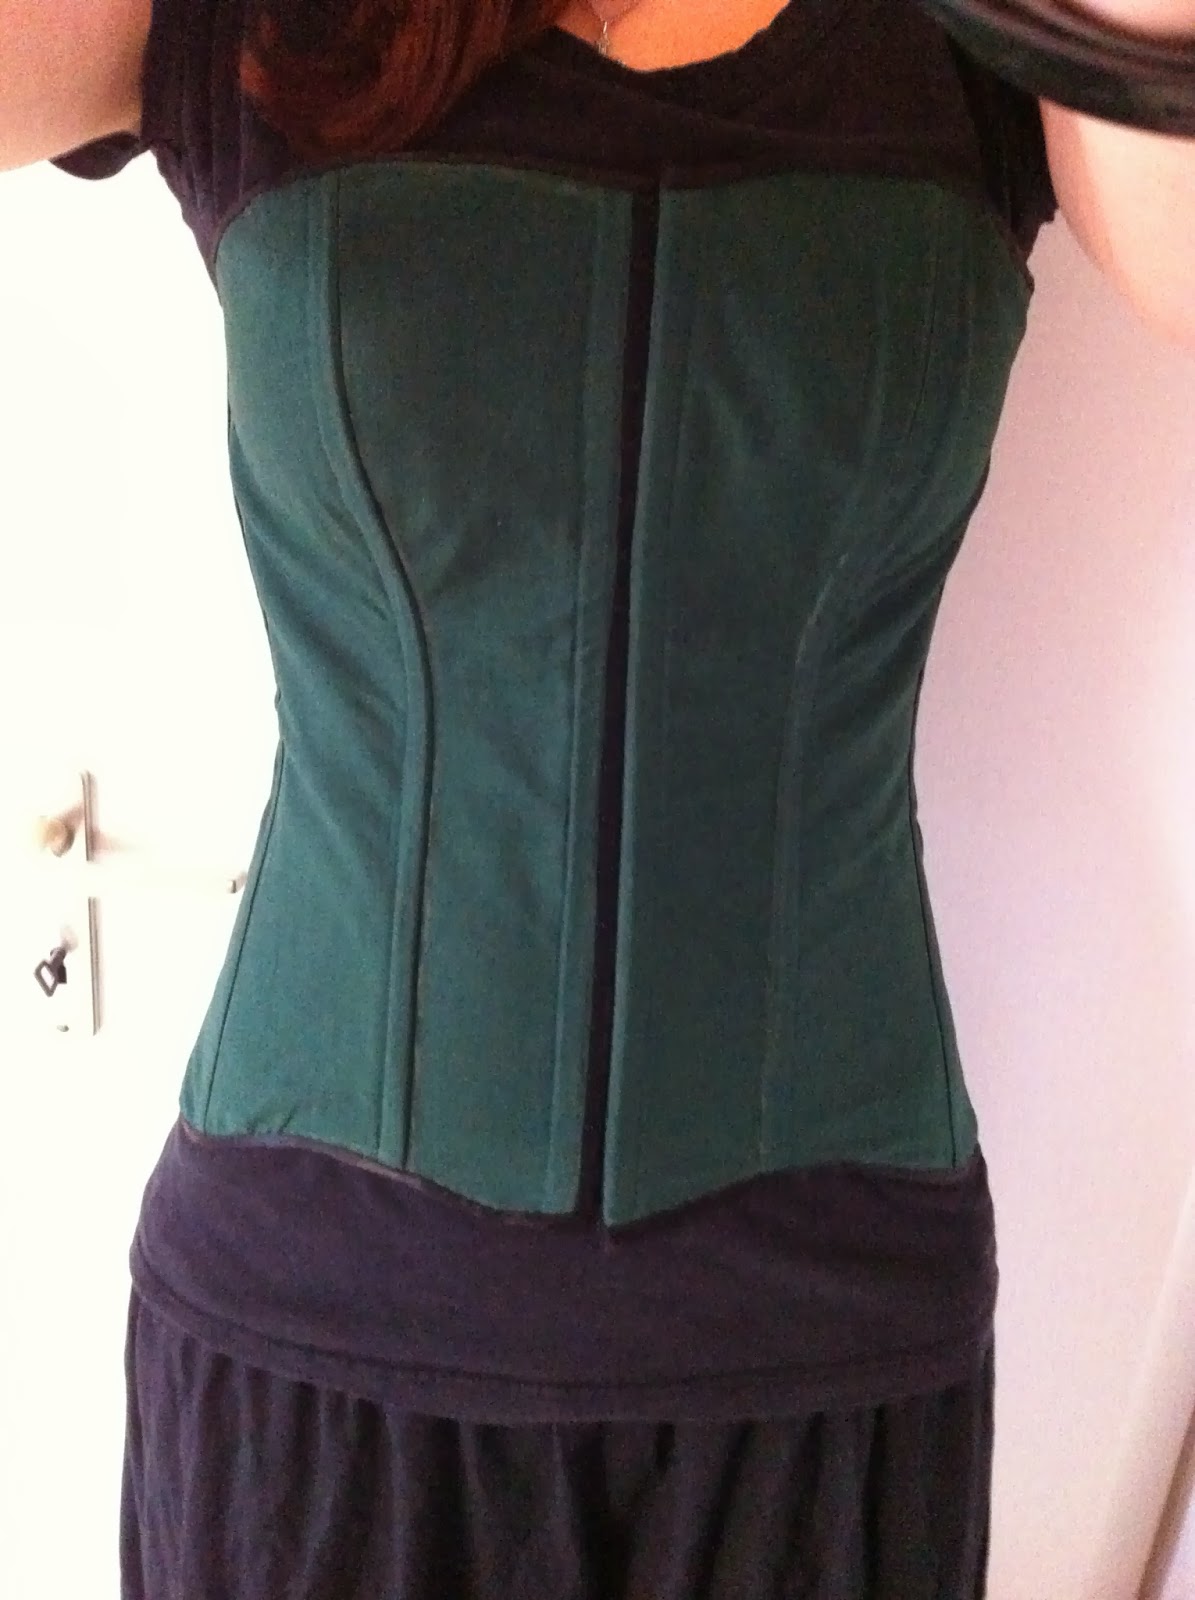
Well, hello, folks! Remember my green corset of fail last fall? I had made a ~1870's corset drafted to my measurements using this guide, but failed to take into account the amount of squish moved from my waist (and lower) into my hips (despite reading several posts about this very problem from more experiened seamstresses, so it's my own fault, really), thus ending up with a corset that did the opposite of what it was supposed to do: it reduced at the hips and added at the waist, giving me a form more tubular than my natural body. 

Just a reminder. Also: Help, I've lost my
Corset Dropbox Folder?
I was ready to chalk it up as a complete failure and move on, but then the nice people over at the HSF Facebook page encouraged me to add in hip gussets. It took me some time to do it, since there was more things to fix then just the hip-width (plus the thought of taking off an reapplying the binding an the bottom swallowed up all of my motivation) but recently I got fed up with studying and took some time to fix what I could. First, I redid the front opening (still hook and eye tape, sorry) because it was a b*tch to close and easily getting in an out of the thing would be necessary to try it on for the changes. But after moving the eyes from between tell layers to on top of the binding, I must say I'm really happy with the closure.
Thusly encouraged, I went on to insert some hip gussets. I didn't want a bone right ontop of my hip and there was a side panel in any case, so instead of opening up a side seam I cut a slit in the middle of the panel from the bottom to my waist (this took several cuts as I was very careful not to cut too far and tried it on in between cuts to see if I had hit my waist yet. I think I could have gone still a bit higher, but I thought better safe than sorry).
Corset with the slit. You can already see the
difference it makes to the shape
Better look at the gap :)


Then I put a piece of scrap fabric on my hip were the slit would be, put on the corset on top and marked the outline of the gap on the fabric. I used this shape as a template for my gusset (after addin seam allowance, of course). I snipped a little y-shape into the top of the slit, folded all the edges inward, pinned the gusset in between the layers and back stitched into place (the execution of that last sentence took several hours, don't be fooled by its shortness!).


After again setting it aside for some time (still dreading the binding) I felt like sewing again I realized that I had just enough black ribbon left over to rebind the bottom edge, so that's what I did (in an easier and prettier way than before, so yay me). After that I figured I might as well go the whole way and crochet some lace for trimming, and after finding this very easy pattern, I went and did just that. I'm pretty sure the crochet was actually the least time consuming part of this entire remake... 
Anyway, now that it gives me more or less the shape I wanted it to and even looks pretty, I'm actually very happy with it! There's still some things I can't fix without taking the whole d*mn thing apart, but I think for a first try, that's tolerable.
I learned a couple of things while working in this (twice), so I feel ready for a "real" corset now. It's gonna have an actual busk, spiral bones, gussets and flossing, and I even have an original pattern if I can figure out how it works. I won't show any pictures until I can, though ;)
On a final note: out of curiosity, I measured the bottom width of the gussets, i. e. the width I would have needed to add to my hip measurements to make this corset work from the start. It's 15cm! I couldn't believe it! I'm starting to think that I miscalculated or measured wrong at some point, because there's just no way all that squish could have come from my waist... O.o 
Anyway, I'm very happy I stuck with it, I can't believe how good it turned out after my disappointment last fall!

Update:
 I've been sitting on the post above for a while now, waiting for an opportunity to get some better pictures of the reworked corset. Well guess what: I'm going to a steampunk party! I knew I'd have about a day to put something together, because I wrote another exam yesterday and will go snowboarding tomorrow, with the party tomorrow night. (Wait, this feels familiar...)
So I took out my finally wearable corset and paired it with several shirts, blouses and even my regency shift until I decided on my black Dirndl blouse (yes, I own a Dirndl. Please don't go around assuming every German owns one, the first time I actually wore a Dirndl was in Canada, but since I live in the south and literally on the border to Bavaria, I bought one last summer. Works great as a Little Red Riding Hood costume, too :) )
To add yet more steampunk flair, I decided to give this video a trial:
Hey, it's Threabanger again! Or at least Corinne from Threadbanger... :) 
I have 10m of black polyester taffeta in my stash, which I bought some time ago simply because it cost 14€ (the entire piece. So, like, 1,40€ per metre. Sometimes my impulse control is not the best :D)
I cut all the pieces, changing the measurements a little (when my fabric's width is 1,40m I'm not gonna be particular about 10cm more or less), making the panels a bit longer and narrower, but I don't think that changes the look very much. Also, I didn't have any lace to sew around the edges, so it's just pinked :)
Because I need a yardstick to cut in a
straight line when I can't rip fabric

Biggest Panel


The video really tells you all you need to know, so here's the only thing i did differently: To tie the outfit together, I wanted to have some of the green fabric of the corset repeated in the bustle. I decided to put a band of gathered trim on the smallest panel, So I ripped two strips of 6cm * 1,50m fabric and sewed them together. I didn't bother with finishing the edges because I liked the ragged, rough look for steampunk and sewed to gathering lines at 2cm in from the edge. (ran out of bobbin thread about 3/4 through on the second line. Didn't feel like taking it out and redoing it, so I restarted the line about a cm further and tied the top and bottom threads each in a knot. Yeah, that's how I roll.)
Pinned on, sewed (along the gathering lines) and again followed the video to make a waisband.
To top it off, I retrimmed a tiny hat my mother bought for carnival years ago, pretty sure it's from H&M. Of course, I forgot to take a "before" photo, but here's the ugly trim I took off:
Luckily for me, it was mostly sewn and hardly glued on, after I snipped all the threads I could just pull off the glued bits with no residues. Finished result:


And on me:


 That hat kept wanting to fall off my head. I need to fix this if I want to wear it for dancing tomorrow night...
Anyway, I'm off to bed now since I neither want to fall asleep snowboarding nor dancing in steampunk attire. See you all next time :)


Montag, 16. Dezember 2013

HSF Challenge 25: One Metre

Argh, where did the time go? That's what happens when you always start two new projects while still working on the first... Anyways, while technically a day late, I finished my shift pretty close to on time despite my sewing ADD. Look here:
This is me without a dress form or a self-timer.
I didn't use a pattern but rather just cut out a couple of large rectangles for the body, smaller rectangles for the sleeves, two squares for the underarm gussets (I made them 15 * 15cm, that worked pretty well) and two triangles for the hip gores/godets/gussets - you know what I mean.
In my last post (about the shift) I showed you the sleeves and my beautifull flatfelled seams - turns out, if you flatfell your sleeves and forget to double-check which side is right and which is left, you end up putting in a sleeve inside out. Not sure if I'm gonna fix that, though, because as I said, you can hardly tell it's the wrong side, plus it would be a lot of work for a piece of underwear that's not even supposed to be seen. So the armholes are the only seams that aren't finished while everything else is flatfelled. I did the shoulder seams last (for no particular reason), so here's the only other time I stopped to take a picture:
Calculating, drawing and cutting the neckline. I bound it with bias-tape which doubles as a casing for the drawstring, which is some Dollarstore Polyester-ribbon I had lying around. All in all, I'm pretty pleased with my first entirely handsewn (!) garment:
Just the facts:
The Challenge: One Metre
Fabric: 1m of white cotton
Pattern: squares, rectangles and triangles
Year: 1800 +/- 10 years
Notions: white bias tape and white poly-ribbon from stash, white cotton thread also from stash
How historically accurate is it? Completely handsewn, but wrong fabric for the era (I think linen would be accurate) and the poly-ribbon... so let's say 50%. Then again, it's underwear, so as long as my hypothetical time-travelling self doesn't get undressed in public, I should be fine.
Hours to complete: at least 3 movies and 8-10 Futurama episodes, so that makes... about eight hours over two weeks
First worn: half an hour ago for the bad cell phone pictures
Total cost: I think it was about 5€ for the fabric, everything else was from stash.


Sonntag, 22. September 2013

I almost forgot...

that I had some pictures to show you! I finished the green corset. And while working on it, I figured that I had finally something to enter into the Historical Sew Fortnightly! (For those of you who don't know what that is, click on that link, read that post and every other post in her blog that has to do with the hsf - it's just amazing!)
I've been ogling all those fantastic creations forever without ever having something to enter myself, but here I go.
No shift, no self-timer (took this on my
phone because I couldn't find my camera)
and waay too little hip
The Challenge: #19: Wood, Metal and Bone

Fabric: Green Cotton and and some unaccountable, probably synthetic, but very sturdy lining fabric from Ikea

Pattern: This.

Year: The pattern says late 1870's...?

Notions: Hooks-and-eyes-tape, satin(?) ribbon, zip ties for the boning

How historically accurate is it? uhm... it is called a corset and corsets were worn in that era, but other than that not at all. I could overlook all the wrong materials if it would at least give me the proper support and silhouette it's supposed to, but it doesn't. Well, better luck next time :)

Hours to complete: never timed it, so no clue.

First worn: for the pictures

Total cost: maybe 10-15€ for the zip ties and the hooks-and-eyes-tape, everything else was from stash. Yay, at least it's a cheap failure ;)

Oh - and it's currently laced with bright blue and green shoelaces because I didn't have anything else, but I don't know under which point to file that info ;)
At least it looks nice from behind :)

I have an idea of ripping up the side seams up to the waist and putting in some hip gussets for some more curving (and to have somewhere for that squish to go, as the Laced Angel puts it).
Does anyone have any ideas if that will work at all? Or should I just go with making a new, improved version all together? After all, this was only supposed to be a trial run?

Freitag, 30. August 2013

This was supposed to be a "finished things" post...

...but I haven't really finished anything recently! Well yes, I finished the yellow minion (weeks ago, before I even came home) and the stole (also weeks ago, when I went to my grandparent's) but I just didn't get around to blogging until now. Also, I don't have any nice pictures of the minion since I conveniently left it in my apartment, so here's the only snapshot I took before hurriedly packing my things and leaving for my parent's:
I gave up on finishing the purple one before Lilly's birthday, but I made a "free-hand"-amigurumi minion for one of the kids I worked with:
That's a thermos and my mother's laptop behind
him, just to give you an idea of the size
I also finally got around to taking pictures of my stole, I like how it turned out although I would have liked it a bit longer - I just gave up when my third ball of yarn was finished.
I really like how it looks from behind


Well, that ought to have caught you up to what I have finished so far. I would have loved to show you the finished green corset, but guess what: I'm about one seem away from finishing it (and have been for about a week now) but still haven't done it. Want to know why? I have two brothers and the three of us share a car, or rather a van. So when my older brother wanted to fix up the car to take it to a camping trip to Spain, of course his siblings jumped in, and since I'm not that good with the technical stuff (we have a bluetooth-connectable stereo in our twenty-year-old car, yay!) I offered to take over renewing the curtains. My brother ordered the fabric and I set to hours and hours of ironing, sewing, and ironing again. Did I mention I was ironing a lot? So, in order to pretty things up a little (and motivate myself) I created even more work for myself by deciding that every tie for the curtains had to have a little crocheted flower attached. Yay for flowers! 
Pretty little daisies... :)

My younger brother was against the flowers (probably not manly enough for an eighteen-year-old ;) ) but my older brother and I liked it, so we kept them. But crocheting, and then sewing each of the flowers onto the tie and then the tie onto the curtain by hand took time, and afterwards I didn't really feel like sewing some more for my own amusement, hence the lack of progress.

BUT!


Some progress there was, and (even if I can't show you the finished result) I'd like to show you some pictures. Before risking bright green checkered nightmares, I worked on my darker green corset. The last thing I told you was that I made one row of eyelets, here's how I did it:
I made the holes with a stretcher I usually
wear in my ear...
...then widened them with an awl i found
in my father's toolbox.


I then stitched around the holes using a thicker, dark green thread I found in my grandmother's sewing box, I think it's supposed to be used for mending socks, but I find it quite handy for lacing- or buttonholes. I put in the hooks and eyes - I know, I'm cheating -


- and tried it on. In hindsight, I really should have listened to The Laced Angel and put in some more room at the hips, but for a first try, it's not that bad, I think.
Phone-camera in a badly lit hallway...

...where could that ever go wrong?


Now all I have to do is finish the top and bottom edges, and then it'll be wearable! :) But as I said, motivation for that last seam still eludes me. Bear with me, it will get done! (someday ;) )


Donnerstag, 8. August 2013

Decisions, decisions...

I have two projects I'd really like to tell you about, but only time for one short post. Hm...
First of all sorry for not writing for so long, I had some exams to write and then my laptop broke down just in time for my arrival home, plus I just started an internship which takes up a lot of my time, so I didn't really get any sewing done despite being in close proximity to a real sewing machine for about a week. Until today, when I decided to finally get some work done on my corset.
I found a really neat technique for constructing corsets online (I'll post my sources as soon as I have time to find them), it goes like this:

Starting with pieces one and two, (shown are three and four)
sandwich fabric and lining of the first piece between the
fabric and lining of the second piece, respective right sides
together
A peek at piece three ;)
Then just sew a seam along the side, press, open, press both sides flat, repeat. It's a quick and easy way to construct corsets and you don't even have to worry about finishing any raw edges :)
Bonus: you can very easily add boning channels, I did one for every seam, we'll see how that works out.
Stitching a boning channel, finished one on the right
As I said, I'm using zip-ties for boning, feels pretty good so far, we'll see how they look and feel when wearing the corset.
Preparing the boning: I clipped of the closures and smoothed
the clipped ends with some sandpaper
I put another boning channel into the back edges and marked where I wanted my eyelets to go.
Looks pretty good so far, what do you think?
I did the eyelets by hand since I don't have any grommets lying around and it is much quicker this way than going to a store, buying some and then spending the evening in the basement hammering them in. I got one row done while watching TV with my mum tonight, and I'm sure I'll have the other row finished soon enough.
I still need some hooks and eyes for closure, though (I know, I'm cheating again) so I'll have to go to a fabric store soon in any case.
This weekend I'll be at my grandparents, so no sewing and no blogging, although I'll probably get some work done on my stole (almost done now!) and my minion, I'll keep you updated on those projects. When I come back, I'll post a tutorial on how to fix ripped jeans - the other thing I finally got done tonight ;)
Have a nice and productive weekend, everyone, I'll see you soon!