Montag, 30. Dezember 2013

HSF #26: Celebrate!

I'm going to a New Years Eve party tomorrow, and didn't have anything to wear. Wait, that's not right. I could have worn my prom/graduation dress (all in one ceremony here in Germany), but that's about knee length and a friend of mine wanted to wear her floor-length prom-dress without feeling overdressed. I had some lovely drapey/flowing black fabric given to my by my brother, who had used it to darken his home-theatre but took it down some time ago. I soon thought about making it into a ~1900 Skirt like The Dreamstress or Fashion through History, but didn't think I'd get it done before New Years, as I'm going snowboarding tomorrow and won't really have time to sew anything. But today at about 5pm I couldn't stop myself and started looking for patterns. From the diagram in Fashion through History's post I could tell that it didn't look too complicated, and amazingly googling "1900 skirt pattern" led me to this site. I looked at several of the patterns, my limited timeframe and my tons of free fabric and decided to make the 3 part skirt:

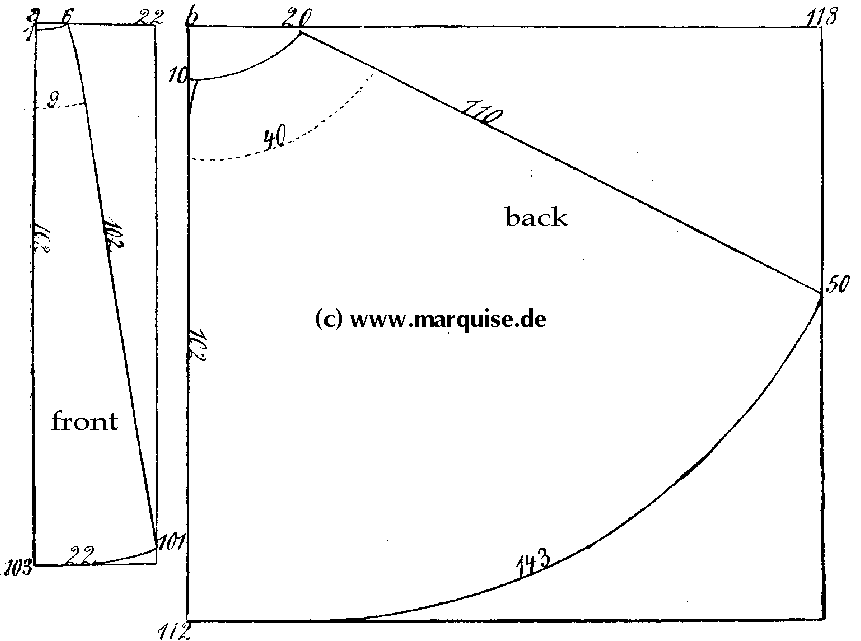
After measuring myself, I made it a little bit longer in the front by lengthening the center front line from 103 to 110 cm. To get even more flare in the back, I enlarged the rectangle from 118x112cm to 130x120cm. And confession time: While I drafted the front piece on a piece of paper and cut it out, I was too lazy to do so (and didn't have a large enough piece of paper without gluing stuff together) for the back piece and just drafted it right ontot the folded fabric. It worked like a charm (and lot quicker than the alternative, too!). 
Due to my rush, I didn't stop to take in progress pictures, but I think the construction is pretty straight forward. I did have to fiddle a bit to get the waist to fit, but those were minor changes. I finished the waist with a facing and did the hem with a rolled hem foot on my sewing machine - thank god for rolled hem foots! (feet...?) I sewed on two snap closures by hand and bam - finished skirt (as long as nobody looks too closely at the inside ;) ). 
I did a quick fotoshoot, but since the party is tomorrow, I'll probably get some better pictures by then. For now, you get this:
I just love how much fabric is in the train, I can easily pull it up and pin/tuck it to my waist for when we're going outside to shoot fireworks at midnight :)
And since this is literally an item made for a celebration, I guess it fit's the HSF challenge number 26: Celebrate!

The Challenge: Celebrate! (a ~1900 three part skirt for New Years Eve)

Fabric: Some synthetic my brother used for darkening purposes in his home cinema. After he took it down, he gave it to me, but he couldn't tell me what it was, just that it had been cheap

Pattern: http://www.marquise.de/en/1900/schnitte/s1900.shtml -> scroll down to the 3 part skirt

Year: it says 1908 somewhere on the website, but I didn't have time to find out if that year applied to my pattern as well. Somewhere around that time in any case

Notions: thread, two snaps -> stash

How historically accurate is it? Not at all. It's historically inspired, but sewn with techniques I'm pretty sure they didn't have in 1900 (rolled hem with a zig-zag-stitch, I think not :D) and the fabric is wrong.


Hours to complete: Two or three, including drafting the pattern. Wow, that went quick!

First worn: Today for some pictures, tomorrow for the party!

Total cost: It's all from stash, so FREE!

I will probably use this for a more historical costume some time, but for now I only have my modern clothes to combine with it. But even though the design of the skirt and the rest is more than a hundred years apart, I think they go pretty well together! 

(Because you made it so far ;) )


Montag, 16. Dezember 2013

HSF Challenge 25: One Metre

Argh, where did the time go? That's what happens when you always start two new projects while still working on the first... Anyways, while technically a day late, I finished my shift pretty close to on time despite my sewing ADD. Look here:
This is me without a dress form or a self-timer.
I didn't use a pattern but rather just cut out a couple of large rectangles for the body, smaller rectangles for the sleeves, two squares for the underarm gussets (I made them 15 * 15cm, that worked pretty well) and two triangles for the hip gores/godets/gussets - you know what I mean.
In my last post (about the shift) I showed you the sleeves and my beautifull flatfelled seams - turns out, if you flatfell your sleeves and forget to double-check which side is right and which is left, you end up putting in a sleeve inside out. Not sure if I'm gonna fix that, though, because as I said, you can hardly tell it's the wrong side, plus it would be a lot of work for a piece of underwear that's not even supposed to be seen. So the armholes are the only seams that aren't finished while everything else is flatfelled. I did the shoulder seams last (for no particular reason), so here's the only other time I stopped to take a picture:
Calculating, drawing and cutting the neckline. I bound it with bias-tape which doubles as a casing for the drawstring, which is some Dollarstore Polyester-ribbon I had lying around. All in all, I'm pretty pleased with my first entirely handsewn (!) garment:
Just the facts:
The Challenge: One Metre
Fabric: 1m of white cotton
Pattern: squares, rectangles and triangles
Year: 1800 +/- 10 years
Notions: white bias tape and white poly-ribbon from stash, white cotton thread also from stash
How historically accurate is it? Completely handsewn, but wrong fabric for the era (I think linen would be accurate) and the poly-ribbon... so let's say 50%. Then again, it's underwear, so as long as my hypothetical time-travelling self doesn't get undressed in public, I should be fine.
Hours to complete: at least 3 movies and 8-10 Futurama episodes, so that makes... about eight hours over two weeks
First worn: half an hour ago for the bad cell phone pictures
Total cost: I think it was about 5€ for the fabric, everything else was from stash.


Sonntag, 1. Dezember 2013

Thinking things through

...is not my forte, appearantly. Alternate title: Hey look, my quilt's got a little window!!
I did not see this coming. Probably because I had that part covered in my construction sketch. So I did just that, cut and ironed the green square and sewed it on top. Phew, there you go:
Before that, I had actually assembled all the patchwork pieces, but since that was just a case of pinning right sides together and sewing straight lines, I didn't take any pictures.
Simultaneously with the green square I cut two green circles - cut a green square, fold and iron it in half, fold and iron that in half and draw on a quarter circle with the center where all the folds meet. While I folded under the edges of the square twice, I tried two different things with the circles: for the smaller one, I folded under the edges twice, which was really a pain to iron/pin and looked all wonky while not attached yet. So for the bigger circle, I just ironed the edges under once, then pinned and sewed both circles to the base to see if they looked different, and if yes, which one looked better. I couldn't tell any differences, can you?

If you are confused now, congratulations on your exceptional visual memory! For everyone else, here's the design sketch for comparison:
Yeah. I rushed the sewing (and pinning etc) for the last circle, as my mother wanted me to clear the table off my sewing things and set it for dinner, so I somehow placed it into the completely wrong corner. Ugh. Thinking things through really doesn't seem to be my forte today. And while I'm not a perfectionist, I really liked my original design, so I put in a good movie, took out my seam-ripper and took the damn thing off. Pinned it in its correct place, took out a needle and some green thread and handsewed it back on (really too much effort to take out and set up the sewing machine again for one small circle...).
Oh, and speaking of realizing stupid, but fixable mistakes: When sewing on the border strips (labeled A & B in my sketch) I realized they were each missing 30cm. I have no idea where they went or rather what I was thinking when I cut (well, ripped) them out, but as most of these borders will be folded over to the backside, I don't sweat it. Because, really: I am done with the top part! Which means no more sewing machine for this project, which in turn means I can take it to my appartment (along with the tablecloth that will serve as backing) where the batting has been lying idly these two months, I think, and begin with the quilting. Yay! :)