Hey, you know what you need for Halloween? Black cats! Coming from an allergy-prone family, I made mine hypoallergenic:
But what's that? A zipper?
That's right, I made a cat purse :D
I didn't really get inspired for Halloween costumes this year until a friend of mine suggested going as witches. True enough, I have a hat and a short black party dress, so why not? But there's a problem with dresses, namely that they don't usually have pockets and I am a smartphone addict. Plus, a hat and a black dress do not a witch make, so why not kill two birds with one stone and stack up on accessories?
I had some black velvet in my stash and after some googling found this pattern. After that, it was pretty straightforward:
pattern
lining/bag
eyes to attach the strap
Unfortunately, I was too sick to have much fun at the actual Halloween party, but now I have an accessory for carnival :)
I know that it's closer to New Years Eve than to Halloween, but I had this post sitting around waiting for me to upload the pictures for the last two months, so here it is ;) Merry Christmas, by the way :)
I don't think I've mentioned this before, but I'm planning a natural form era costume. I'm not telling you what it's supposed to be yet, since that would be embarrassing if I never finish it. But it's definitely supposed to be a costume, so I'm absolutely okay with historical inaccuracies such as using the black polyester taffeta I once bought 10m of for 14€ ;)
I used this guide, and basic math & imagination for the gored front panels.
Pictured: Basic math and imagination ;) You can see where I toyed with several options for the side panel. Construction is pretty basic, so I didn't take many pictures:
One fabric width (150cm) for the upper back panel, two for the lower. They were supposed to be 50cm high each, but at some point I lost 10cm in total from the back panels, which is why it's kind of asymmetrical in the picture. I ended up triming the 10cm from the front panels as well.
Trying out the pleating...
And setting in the waistband. I'm very proud of the overlapping closure, even though it took a lot of trial and error and still isn't perfect. Well, at 1,40€ per metre I'm okay with this being a test piece ;)
I did a simple double turned hem because the fabric was a little too stiff to work nicely with a rolled hem foot. I also cursed myself because I had to iron crouching on the floor, and at ~4,5m hem circumference my legs did not like me when I was finally finished. Something else I'm proud of: I actually finished all seams! Just simple zig-zag and one pinked, but I usually never finish seams (I might have mentioned I'm lazy).
And the finished product: (with an improvised bumpad, so it looks nicer:)
I will take pictures of me wearing it some time, but that might only be when I make some more pieces to this costume, we'll see. At least I'm finally motivated to sew again :)
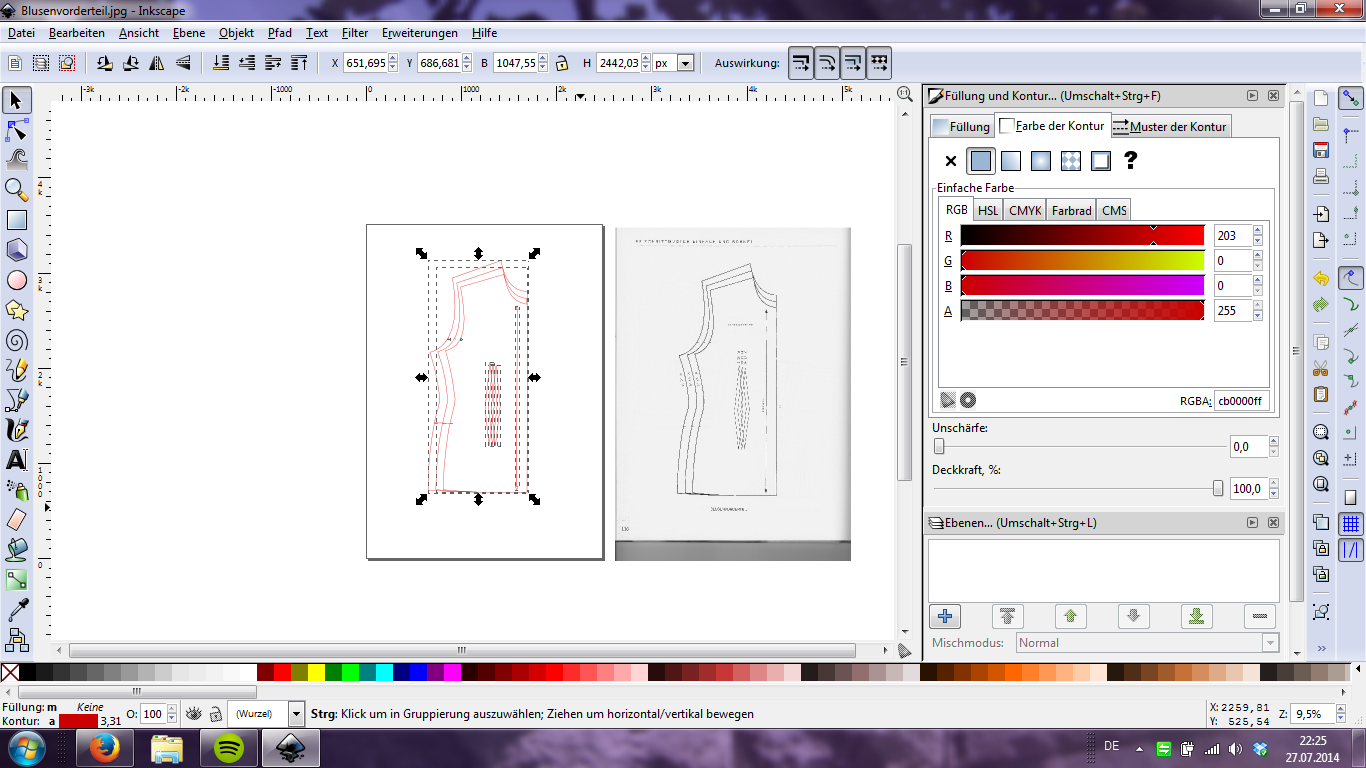
As you might have noticed by now, I kind of hate buying patterns, instead working with what I can find on the internet or my mothers pattern-making book. If you've read my post about the Stardress, you know how I usually enlarge patterns manually. But that's a lot of work, so recently I began to look at ways to enlarge patterns using my computer. What I found is Inkscape, an open source program to draw vector graphics. If you search for Inkscape on youtube etc, you'll find a lot of tutorials for all kinds of neat things, but I couldn't find a tutorial to enlarge sewing patterns, so here it is:
First things first, you don't need any fancy equipment for this, just the program and a mouse. I also suggest to watch one or two of the tutorials on youtube because you'll need to use the Bézier tool quite a lot and it's just easier to learn from a video. Ready? Here we go!
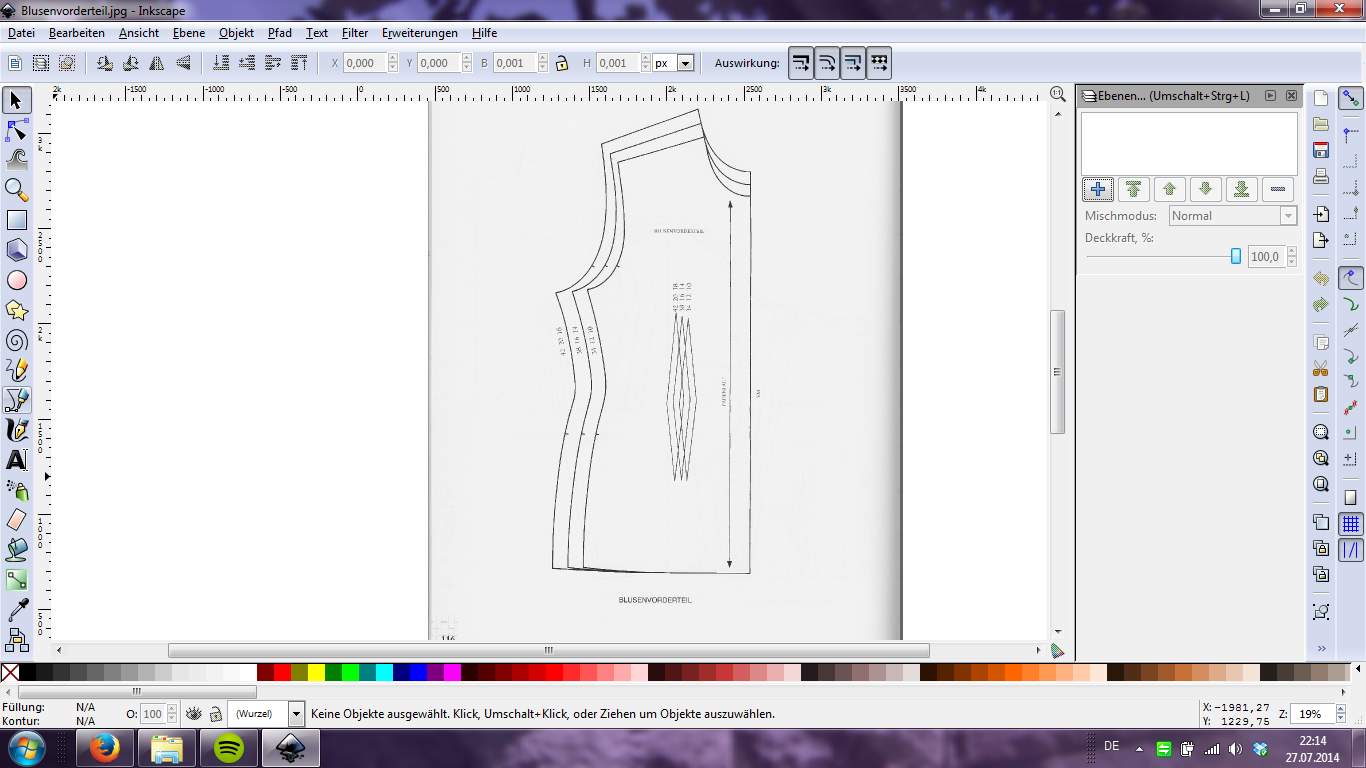
You'll need a pattern you want to enlarge first, of course. I used one of the quarter sized ones in the back of my mother's pattern making book and scanned it; for some reason, the scanner saved it at three times the size of the original, so I had to make some more calculations than normal, but as long as you know the ratio between your beginning and end point, you should be fine.
Open the image in Inkscape, I just click ok when it asks wether to embedd or do something else.
Please click on the image if it's too small ;)
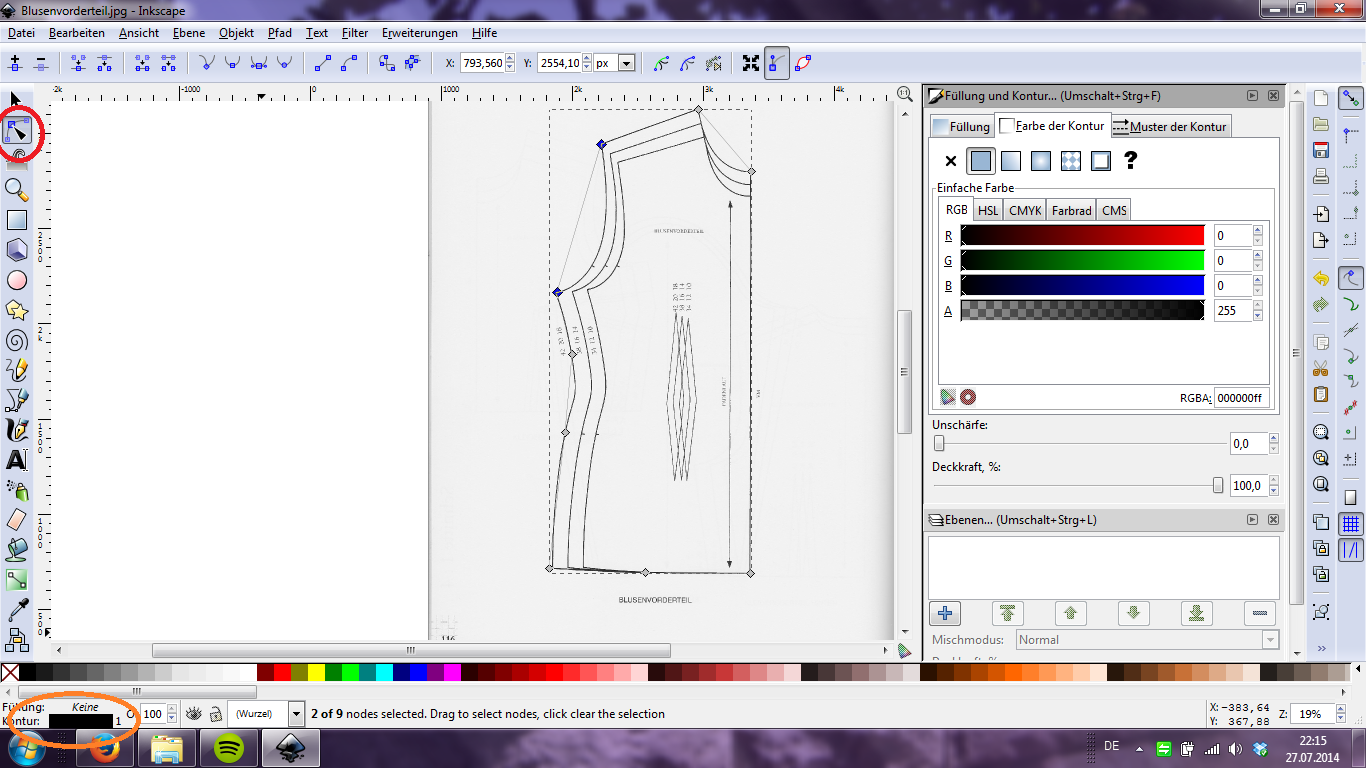
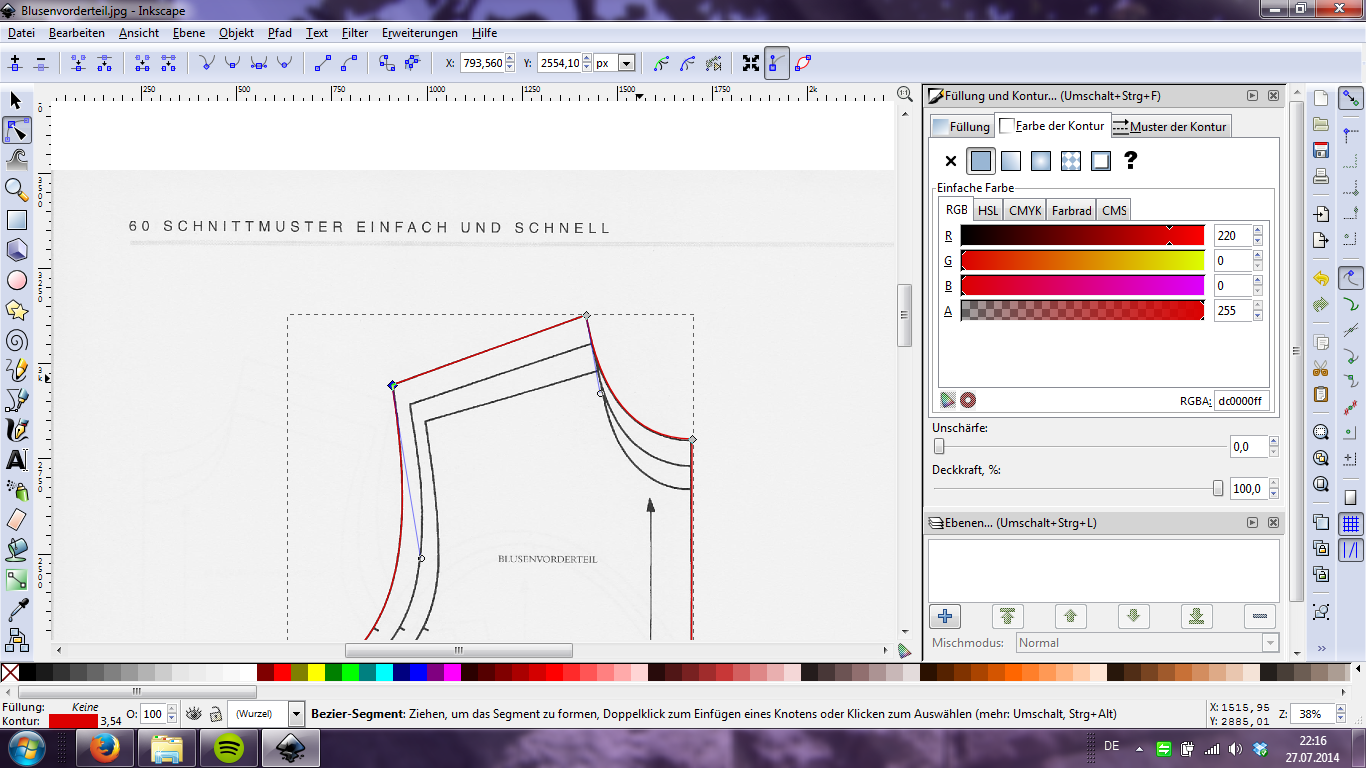
Then, using the Bézier tool, start tracing the pattern. I usually start with the biggest size and work my way to the smaller sizes, darts, grain lines etc. Make sure you trace everything you want to have on your big pattern!
The Bézier tool, in case you didn't watch any tutorials
You'll need this tool to manipulate the straight lines into curves; If you click here the window on the right side opens up
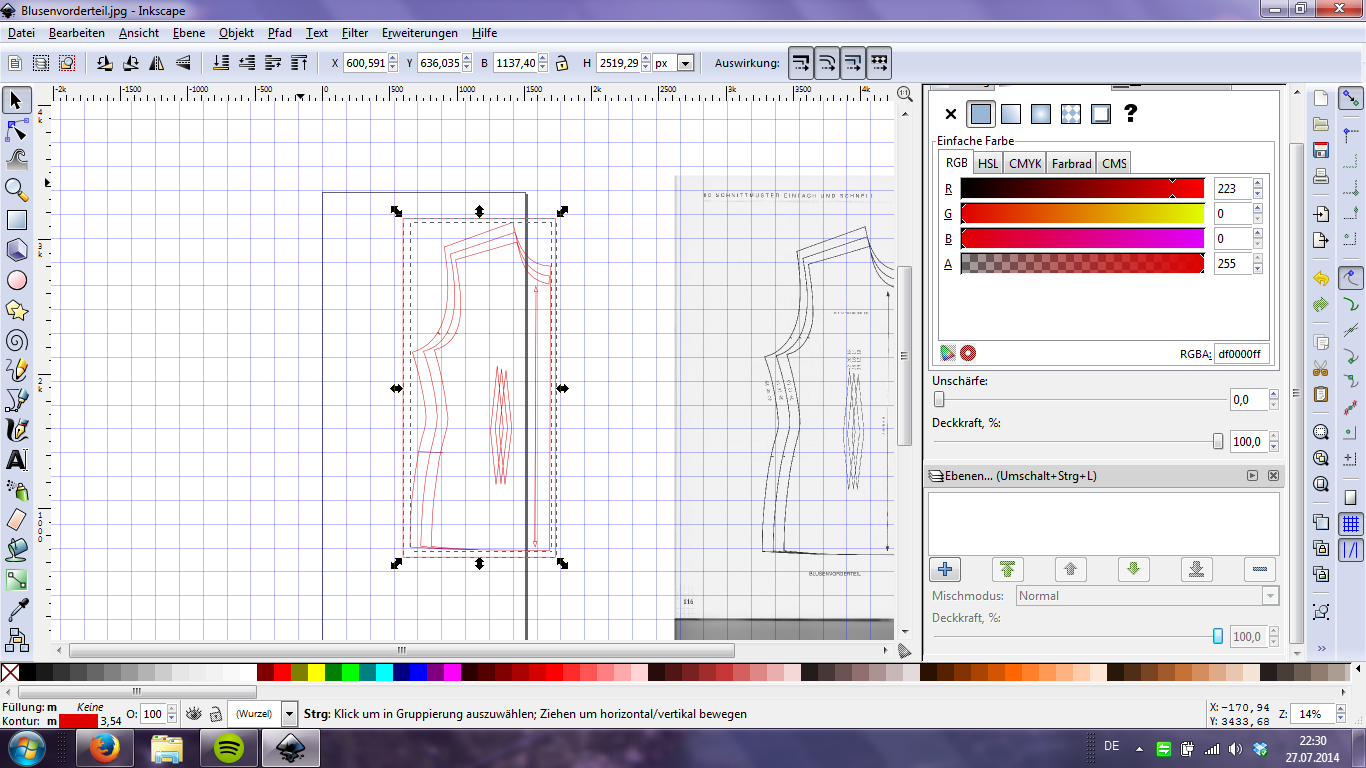
To make it easier on my eyes, I make all the lines red and 1mm thick using the window on the right side.
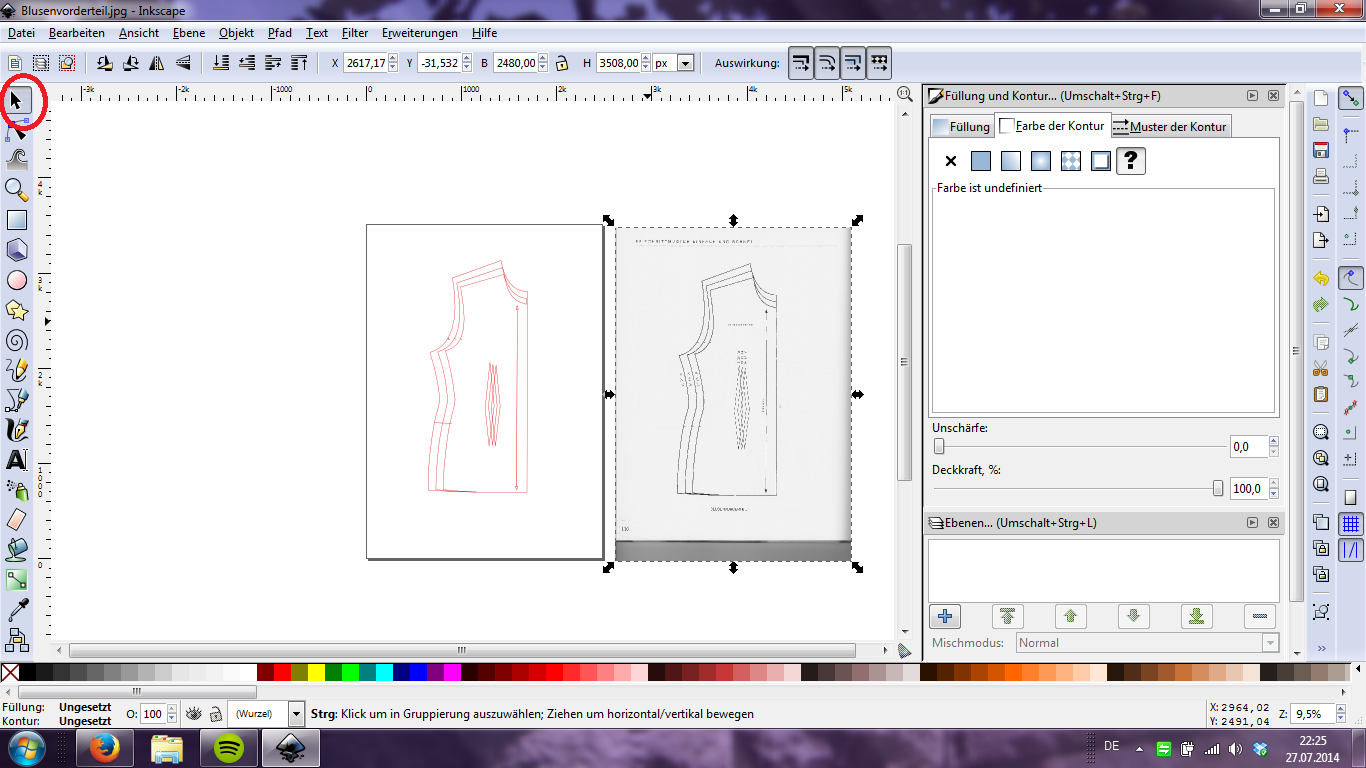
Work in progress...
...and all done
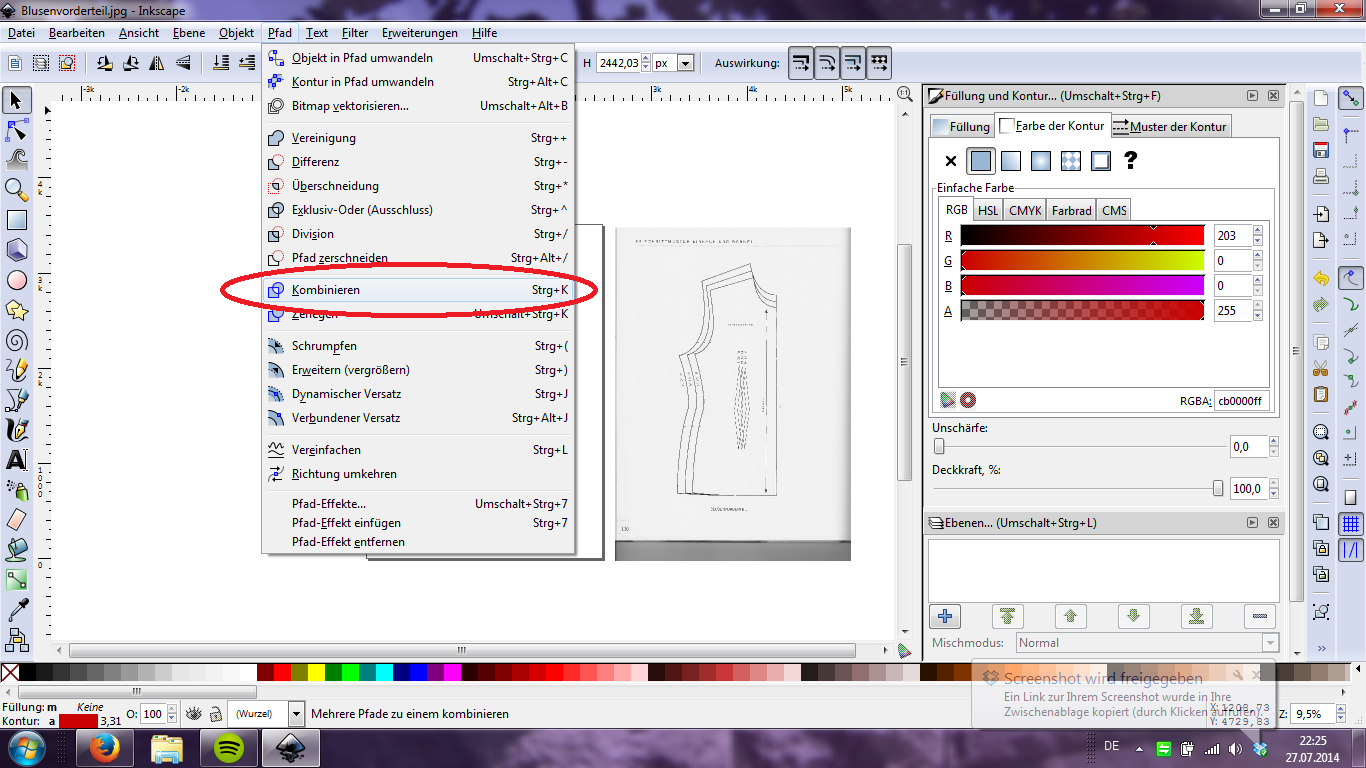
Now we manipulate our lines a little:
Using the selection tool, drag your background off the page. We don't need that anymore! :)
Select all your lines by drawing a big rectangle over all of them, still with the selection tool
Now combine them, so you can move them all at the same time.
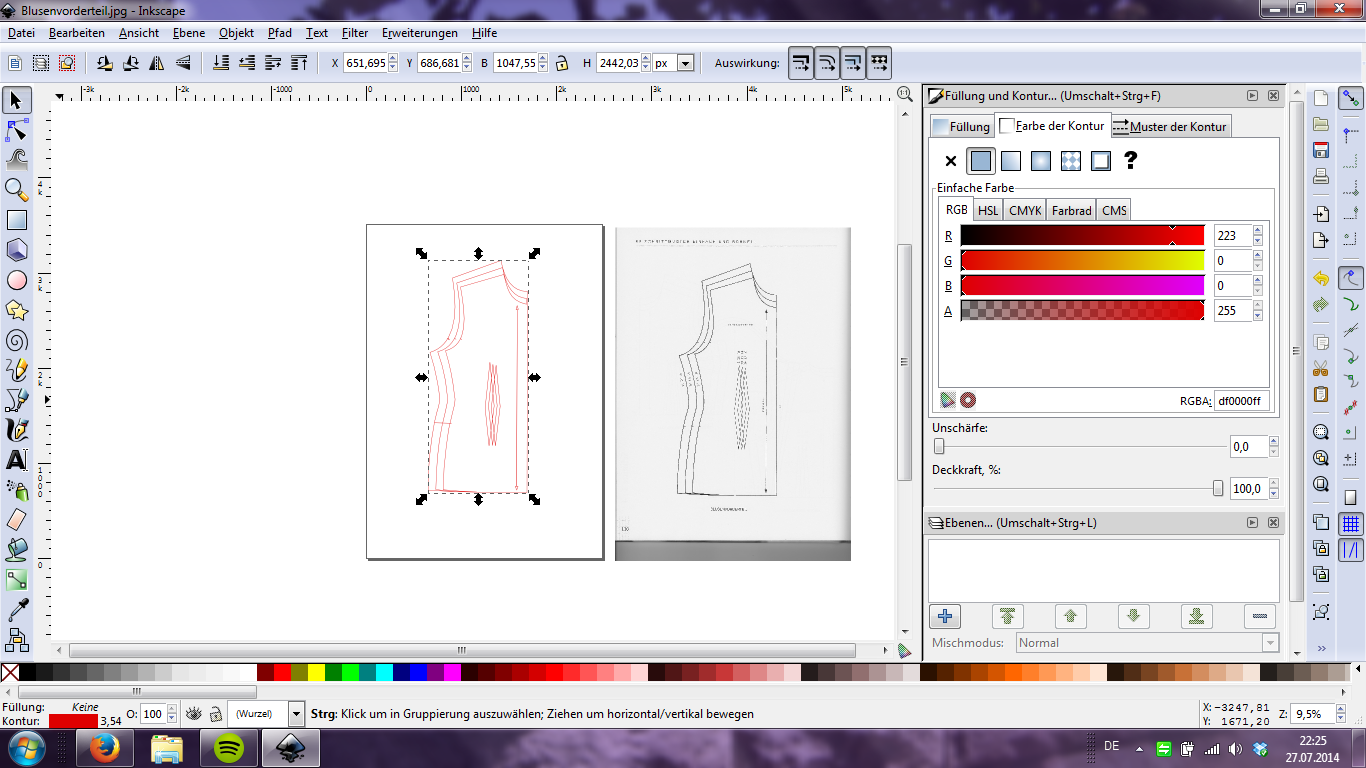
It should look something like this.
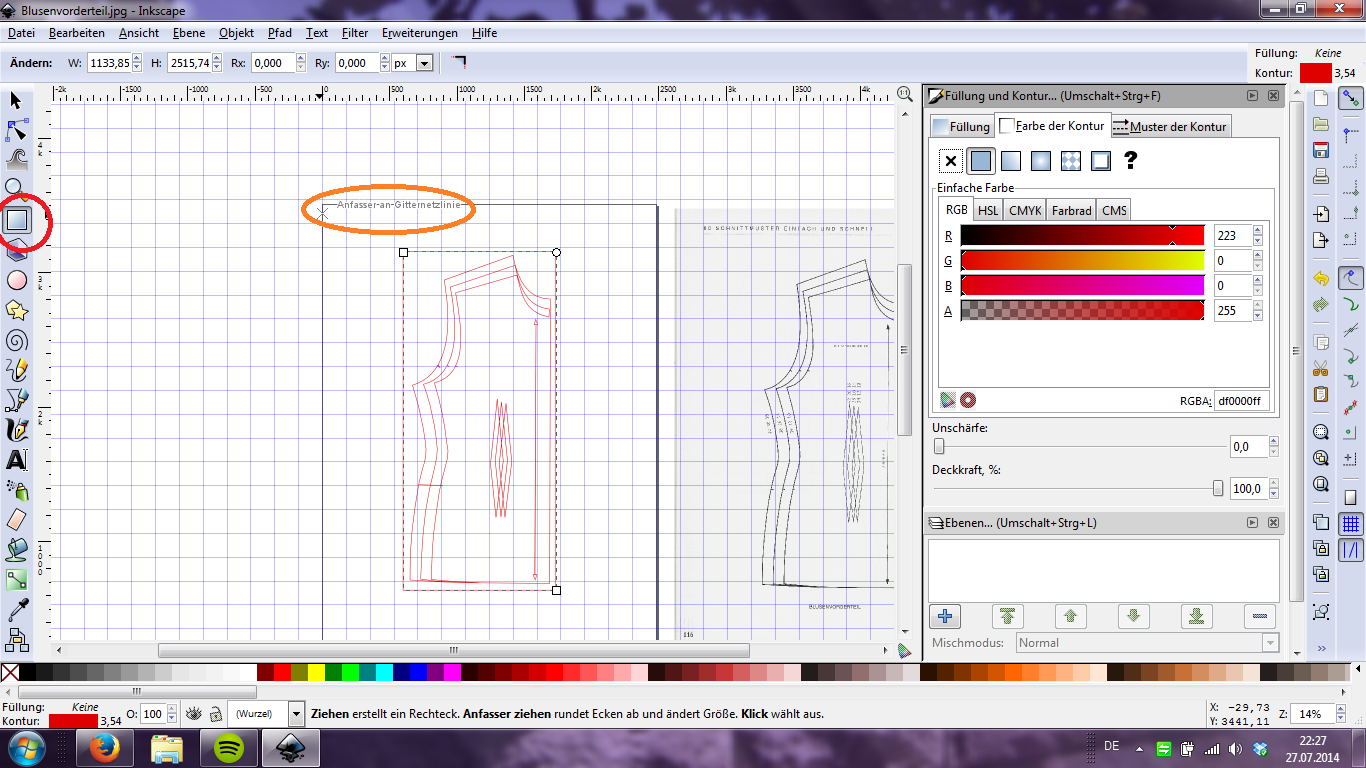
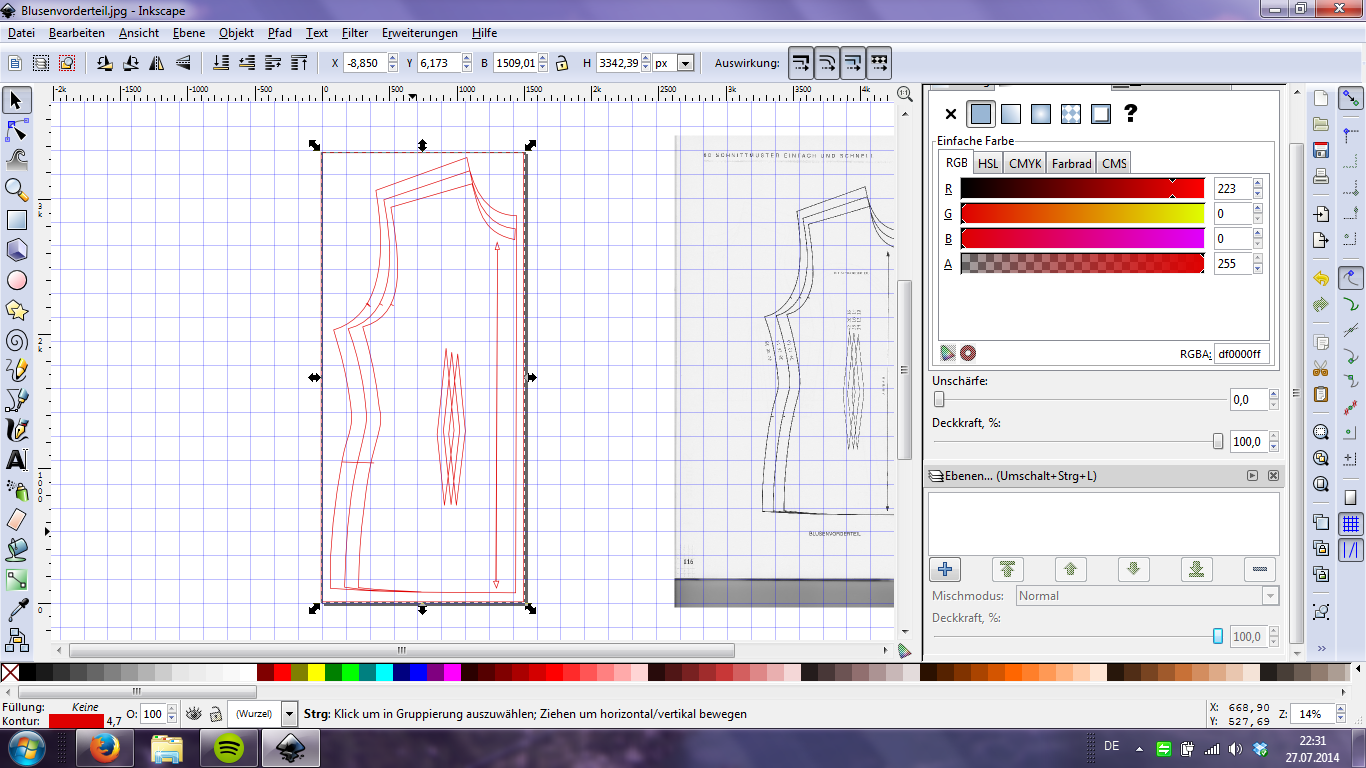
Now we need a grid:
I like mine to be a 1cm x 1cm grid, with thicker lines every 5cm for better visibility, but that's just personal preference.
When I have the grid, I draw another rectangle around the entire pattern. This means that the edges "stick" to the grid, which is very useful.
Make sure you combine the rectangle with the other lines like you did before!
Now I count the squares within the rectangle, write them down and do a little math on them. This is where you need to know your ratio, my book says 1:4, but since my scanner for some reason saved the image at three times its original size, I had to divide by three and then multiply by four.
What, you didn't think that this was gonna be entirely digital, did you?
Using the same window where you found the grid settings before, you can now change the page size to your new measurements.
If it looks like this, you're almost done!
Now we're actually enlarging the pattern:
Still with the selection tool, move it to one corner of the page
And, keeping Ctrl pressed, pull on one of the corners until you meet the corner of the page.
It pays to zoom in at this point to get all the edges lined up. Remember to keep Crtl pressed when pulling on the corner, or the width to height ration distorts.
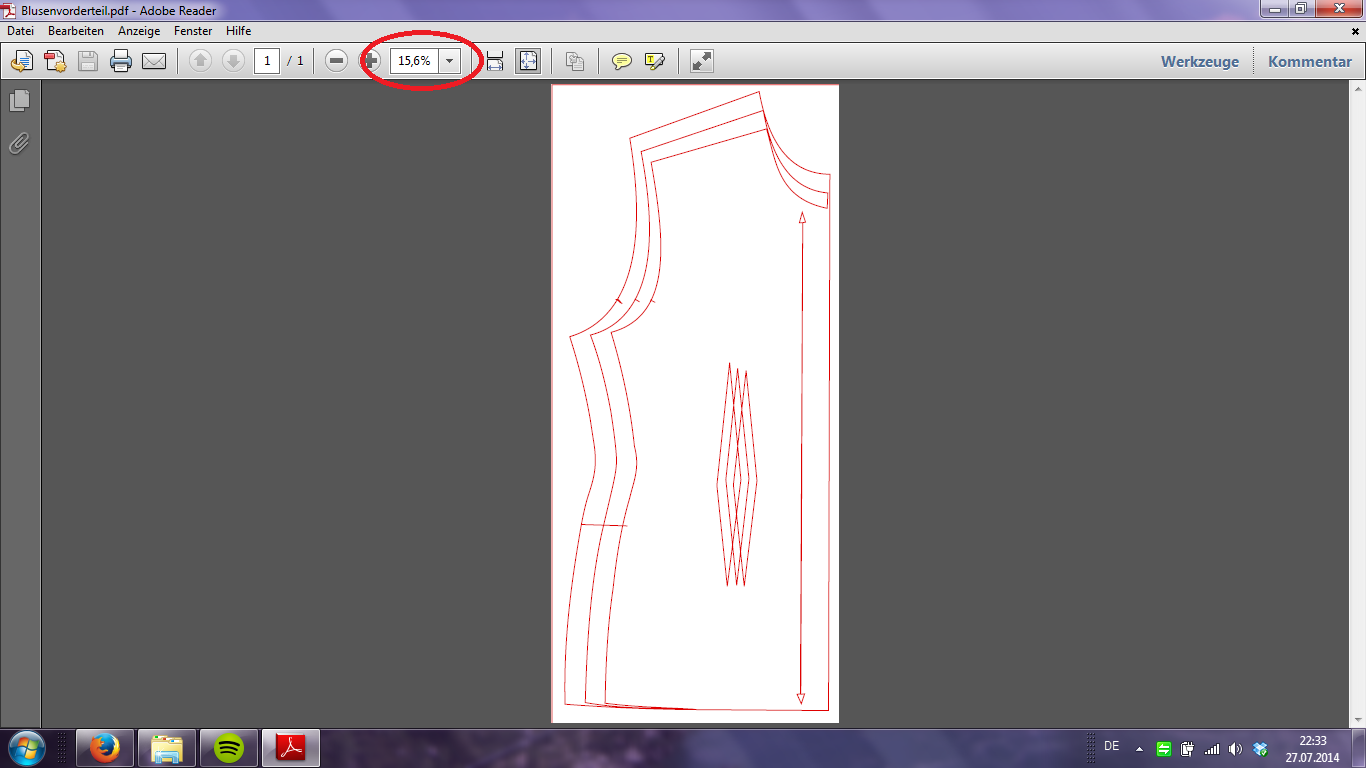
Okay, that's as far as we get using Inkscape. I suggest saving your work as an .svg file (the default option), so that you can come back and manipulate it further later on, if you need to. But if you actually want to print it out, I suggest saving as a .pdf file, using the "save as " button.
That's what my finished product looks like, note the zoom factor
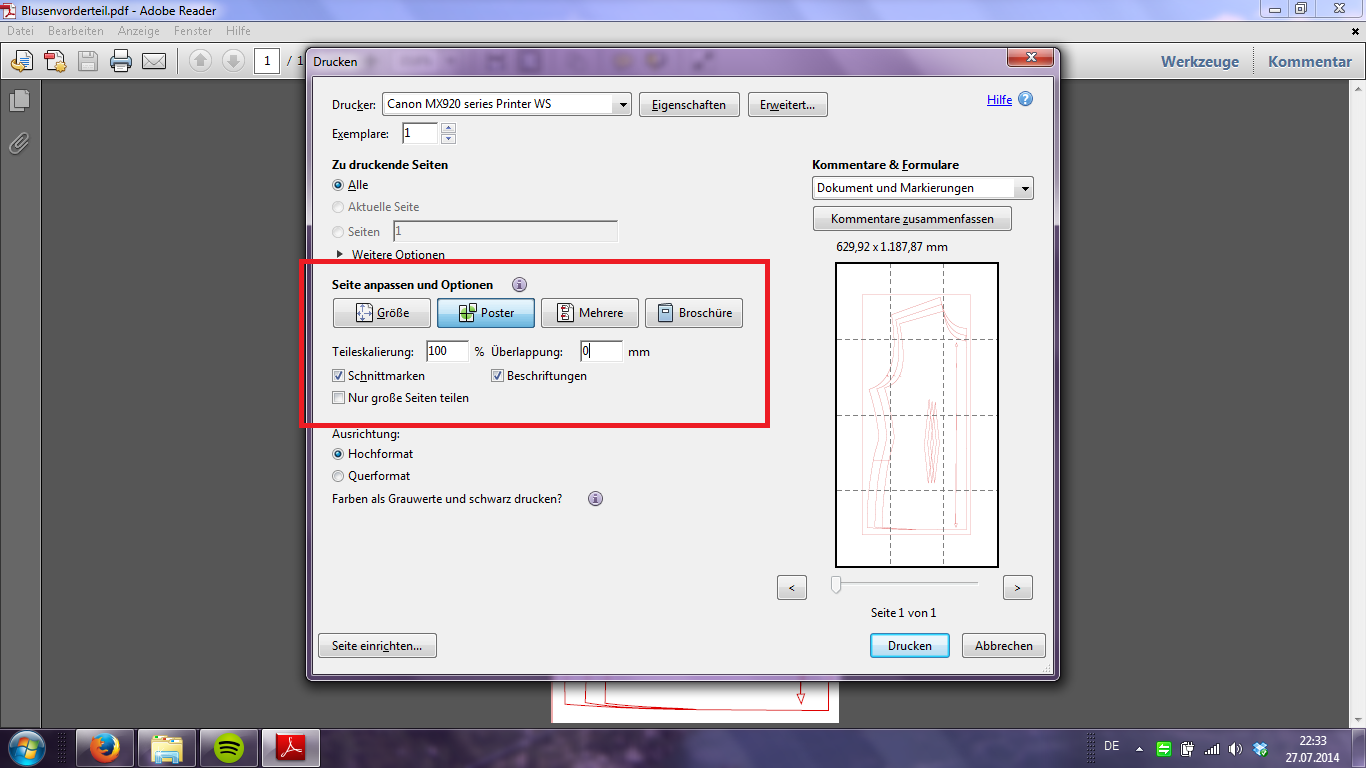
One last tip, because I didn't know this before: you can actually print this out at home, using the "poster" button in your print menu:
You might wanna select some overlap if you want to glue it together later
I hope that this helps some of you, if you have any questions, shoot, but keep in mind that I too am still learning to work with this program ;)
Right now I'm working on converting all the basic patterns from my mother's pattern book into printable patterns so that I don't lose any time enlarging next time I want to use one of them.
To be honest, I haven't really been sewing much lately. It's not that I didn't have the time, I just wasn't motivated enough to use that time to sew. But I've been doing some prep work, and other little things, that I didn't deem interesting enough to justify a blog post. But since this break is getting kind of long, here's some bits and pieces:
-the circular gallifreyan shirt:
Finished embroidering the collar and halfway attached it to the base of the shirt. Now I'm too lazy to iron it so I can finish attaching it.
attached collar
finished embroidery
- patterns:
I bought a pattern for a vest/waistcoat/gilet (I have no clue what to call it in English), because up until now, I always stole my brother's when I wanted to wear one. I traced the pieces I needed instead of cutting them because I wasn't too sure about the size I needed and didn't want to destroy the paper pattern, so that's as far as I got.
No pictures yet, so you get the pattern envelope. I'll be doing view A first
Also in patterns: I'm still scaling up a 19th century corset pattern, I even have some fabric for it.
enlarging the gussets
I will be doing full posts when (if) I finish any of these, but right now I'm kind of busy with other things. We'll see how it goes.
Pattern found here, scroll down and you should be able to find it. I love drawn instructions, so much easier to follow than written ones... In any case, the pattern repeats itself every four rows, so I knew it by heart pretty quickly. So far, I have about 5m of lace and still some yarn left, I kinda challenged myself to crochet the whole roll of yarn into one continuous strip of lace. I already finished all four seasons of raising hope while crocheting, so this is gonna take some time, but I like having an easy continuous project for things like watching tv, riding the train etc. I just have to see if I can make something cool/pretty/useful out of it when I'm done. Hm...
In other news, I have some plans for a shirt/tunic for the summer (fabric's bought, you'll see more when it's out of the wash) which will feature some embroidery. While I love the look of blackwork I don't feel up for counted thread embroidery on a finely woven fabric and even after some considerable time couldn't find a decent pattern (or any pattern, actually) for the later, more curved and freely flowing (floral) designs, I looked for other inspiration.
I've dabbled in Circular Gallifreyan before, but it's hard to do nicely by hand, so tonight I busted out the computer - and Paint. Really, I tried Gimp, but it just wouldn't give me a tool do draw circle shapes! Anyway, because I wanted it evenly, I drew 3 different sizes of circles and after that only used the copy/paste/move tool, the eraser and sometimes brush (for the dots). Oh, and the straight lines tool, because who the hell could ever draw a straight line with a mouse :)
I used the "A good man goes to war" poem from the Doctor Who episode of the same name, here's the first verse:
Don't worry about the writing at the top, I do know how to spell, it just helps visualizing how many circles you need when you write it out that way.
It was quite fun to make and I'll certainly do the rest of the poem as well. I think it would make a nice pattern as embellishment for collar, cuffs or hem of a simple white shirt.
That's all for today! Have a happy Easter, everyone :)
Well, hello, folks! Remember my green corset of fail last fall? I had made a ~1870's corset drafted to my measurements using this guide, but failed to take into account the amount of squish moved from my waist (and lower) into my hips (despite reading several posts about this very problem from more experiened seamstresses, so it's my own fault, really), thus ending up with a corset that did the opposite of what it was supposed to do: it reduced at the hips and added at the waist, giving me a form more tubular than my natural body.
Just a reminder. Also: Help, I've lost my Corset Dropbox Folder?
I was ready to chalk it up as a complete failure and move on, but then the nice people over at the HSF Facebook page encouraged me to add in hip gussets. It took me some time to do it, since there was more things to fix then just the hip-width (plus the thought of taking off an reapplying the binding an the bottom swallowed up all of my motivation) but recently I got fed up with studying and took some time to fix what I could. First, I redid the front opening (still hook and eye tape, sorry) because it was a b*tch to close and easily getting in an out of the thing would be necessary to try it on for the changes. But after moving the eyes from between tell layers to on top of the binding, I must say I'm really happy with the closure.
Thusly encouraged, I went on to insert some hip gussets. I didn't want a bone right ontop of my hip and there was a side panel in any case, so instead of opening up a side seam I cut a slit in the middle of the panel from the bottom to my waist (this took several cuts as I was very careful not to cut too far and tried it on in between cuts to see if I had hit my waist yet. I think I could have gone still a bit higher, but I thought better safe than sorry).
Corset with the slit. You can already see the difference it makes to the shape
Better look at the gap :)
Then I put a piece of scrap fabric on my hip were the slit would be, put on the corset on top and marked the outline of the gap on the fabric. I used this shape as a template for my gusset (after addin seam allowance, of course). I snipped a little y-shape into the top of the slit, folded all the edges inward, pinned the gusset in between the layers and back stitched into place (the execution of that last sentence took several hours, don't be fooled by its shortness!).
After again setting it aside for some time (still dreading the binding) I felt like sewing again I realized that I had just enough black ribbon left over to rebind the bottom edge, so that's what I did (in an easier and prettier way than before, so yay me). After that I figured I might as well go the whole way and crochet some lace for trimming, and after finding this very easy pattern, I went and did just that. I'm pretty sure the crochet was actually the least time consuming part of this entire remake...
Anyway, now that it gives me more or less the shape I wanted it to and even looks pretty, I'm actually very happy with it! There's still some things I can't fix without taking the whole d*mn thing apart, but I think for a first try, that's tolerable.
I learned a couple of things while working in this (twice), so I feel ready for a "real" corset now. It's gonna have an actual busk, spiral bones, gussets and flossing, and I even have an original pattern if I can figure out how it works. I won't show any pictures until I can, though ;)
On a final note: out of curiosity, I measured the bottom width of the gussets, i. e. the width I would have needed to add to my hip measurements to make this corset work from the start. It's 15cm! I couldn't believe it! I'm starting to think that I miscalculated or measured wrong at some point, because there's just no way all that squish could have come from my waist... O.o
Anyway, I'm very happy I stuck with it, I can't believe how good it turned out after my disappointment last fall!
Update: I've been sitting on the post above for a while now, waiting for an opportunity to get some better pictures of the reworked corset. Well guess what: I'm going to a steampunk party! I knew I'd have about a day to put something together, because I wrote another exam yesterday and will go snowboarding tomorrow, with the party tomorrow night. (Wait, this feels familiar...)
So I took out my finally wearable corset and paired it with several shirts, blouses and even my regency shift until I decided on my black Dirndl blouse (yes, I own a Dirndl. Please don't go around assuming every German owns one, the first time I actually wore a Dirndl was in Canada, but since I live in the south and literally on the border to Bavaria, I bought one last summer. Works great as a Little Red Riding Hood costume, too :) )
To add yet more steampunk flair, I decided to give this video a trial:
Hey, it's Threabanger again! Or at least Corinne from Threadbanger... :)
I have 10m of black polyester taffeta in my stash, which I bought some time ago simply because it cost 14€ (the entire piece. So, like, 1,40€ per metre. Sometimes my impulse control is not the best :D)
I cut all the pieces, changing the measurements a little (when my fabric's width is 1,40m I'm not gonna be particular about 10cm more or less), making the panels a bit longer and narrower, but I don't think that changes the look very much. Also, I didn't have any lace to sew around the edges, so it's just pinked :)
Because I need a yardstick to cut in a straight line when I can't rip fabric
Biggest Panel
The video really tells you all you need to know, so here's the only thing i did differently: To tie the outfit together, I wanted to have some of the green fabric of the corset repeated in the bustle. I decided to put a band of gathered trim on the smallest panel, So I ripped two strips of 6cm * 1,50m fabric and sewed them together. I didn't bother with finishing the edges because I liked the ragged, rough look for steampunk and sewed to gathering lines at 2cm in from the edge. (ran out of bobbin thread about 3/4 through on the second line. Didn't feel like taking it out and redoing it, so I restarted the line about a cm further and tied the top and bottom threads each in a knot. Yeah, that's how I roll.)
Pinned on, sewed (along the gathering lines) and again followed the video to make a waisband.
To top it off, I retrimmed a tiny hat my mother bought for carnival years ago, pretty sure it's from H&M. Of course, I forgot to take a "before" photo, but here's the ugly trim I took off:
Luckily for me, it was mostly sewn and hardly glued on, after I snipped all the threads I could just pull off the glued bits with no residues. Finished result:
And on me:
That hat kept wanting to fall off my head. I need to fix this if I want to wear it for dancing tomorrow night...
Anyway, I'm off to bed now since I neither want to fall asleep snowboarding nor dancing in steampunk attire. See you all next time :)