Posts mit dem Label Something completely different werden angezeigt. Alle Posts anzeigen

Dienstag, 2. Juli 2024

Zwillings-Stillkissen-Bezug

 Seitdem klar wurde, dass wir Zwillinge bekommen, habe ich immer wieder neu diesem Stichwort gegoogelt, weil viele Tipps und Baby-must-haves für uns eben doch nicht so selbstverständlich waren ("Babybett Zwillinge", "Stillapp Zwillinge", "Stillkissen Zwillinge"). Deshalb der etwas umständliche Titel, vielleicht landet ja Mal jemand in einer ähnlichen Situation hier und profitiert von meinen Erfahrungen. 

Wir hatten das große Glück, viel Ausrüstung von der Verwandtschaft gebraucht geschenkt und geliehen zu bekommen, so auch ein großes, klassisches Stillkissen (welches mir übrigens in der Schwangerschaft als Seitenschläferkissen den Schlaf gerettet hat, nachdem der Besuch zu groß wurde, um noch auf dem Bauch zu schlafen), leider war es zum Tandemstillen von Zwillingen für mich vollkommen ungeeignet, da es sich zu leicht verformte. Auf Empfehlung meiner Hebamme, mir ein "amerikanisches Stilltablett" zuzulegen fand ich nach längerer Internet Recherche schließlich dieses hier von my Brest friend, welches ich immer noch sehr gerne benutze und mir zwischendurch die Hände so frei mache, dass ich beim stillen häkeln konnte. Leider ist es aber so groß und sperrig, dass es unpraktisch für unterwegs ist. 

Nach einem vorzeitig unterbrochenen Spaziergang, bei dem ich 40 min auf einer Parkbank mit nacheinander stillen verbrachte, während meine Mutter das jeweils andere (schreiende) Baby durch die Gegend trug, brachte sie mich auf die Idee eines aufblasbaren Stillkissens. Ich habe sie zunächst ausgelacht, dann aber doch gegoogelt und wurde fündig, dieses hier auf Etsy (Luki Luke von Anihappykidsshop) erschien mir am vielversprechendsten. Die Reviews monierten zwar fast alle die Rutschigkeit des Bezugs, aber ich kann ja nähen! Der mitgelieferte Bezug war tatsächlich zu rutschig, sobald Gewicht auf das Kissen kam, rutschte es vom Körper weg. Aber die Form war super und es gelang mir auch (mehr schlecht als recht und mit Hilfe) das Kissen mit einem langen Tuch so um meinen Bauch zu binden, dass es nicht weg rutschen konnte, und siehe da, ich konnte super damit stillen. Ein Bezug, der nicht so rutschte und den man hinter dem Rücken zubinden könnte, würde alle diese Probleme lösen.

Das tatsächliche Nähen war relativ straight forward: ich faltete das luftleere Kissen in der Mitte, zeichnete den Umriss etwas größer auf Pappe und hatte mein Schnittmuster. Als Stoff habe ich einen schön gemusterten Kissenbezug genommen, da er nur 40×80cm groß war musste ich auf der Vorderseite etwas stückeln, aber das fällt nicht negativ auf. Die Unterseite öffnet mit einem Schlitz, damit man noch ans Ventil kommt (und den Bezug nach dem Nähen auf rechts drehen kann), die Bändel gehörten Mal zu den Reißverschlüssen der Kissen. 


Das Kissen ist wirklich sehr praktisch, da man es sehr klein zusammenrollen kann, natürlich ist es für die Mädels nicht ganz so bequem wie das große Kissen, aber für unterwegs Gold wert. Jetzt überlege ich noch, ob ich mir ein zweites kleines Stillkissen mit dem Schnittmuster nähe und mit Füllmaterial fülle, um ein kleineres Kissen z.B. für den Urlaub zu haben. Ich weiß nur noch nicht genau, womit ich es denn füllen würde 🤔

Mittwoch, 8. Juli 2015

More Doubleface!

I recently read that if you want to accomplish something, you shouldn't talk about it, because simply telling other people of your plans gives you a similar sense of satisfaction as actually finishing it, thus diminishing your motivation. I've had that happen way too many times, so here's my recent knitting without telling you (yet) what I plan to do with it ;)


The first picture is always of the front, the second of the back, at least unless I change my mind later on. The patterns for these four blocks I made myself using this tool and images I found on the internet. (I didn't remember to bookmark the source. I know, I'm bad. I'm so sorry.)


These patterns actually came from ravelry (they have a lot of doubleface-usable patterns, if you look into the filet crochet patterns ;) ) and I expanded them so they would have a 50 stitches x 50 rows size, because that seemed like a reasonable size for my blocks.
I transfered all patterns into excel (by hand) and am currently working on some more. If I ever finish what I had in mind for these, I'll upload a couple of files with patterns etc. Until then, I'll be knitting ;)

Dienstag, 23. Dezember 2014

Cat

Hey, you know what you need for Halloween? Black cats! Coming from an allergy-prone family, I made mine hypoallergenic:

But what's that? A zipper?
That's right, I made a cat purse :D
I didn't really get inspired for Halloween costumes this year until a friend of mine suggested going as witches. True enough, I have a hat and a short black party dress, so why not? But there's a problem with dresses, namely that they don't usually have pockets and I am a smartphone addict. Plus, a hat and a black dress do not a witch make, so why not kill two birds with one stone and stack up on accessories?
I had some black velvet in my stash and after some googling found this pattern. After that, it was pretty straightforward:
pattern

lining/bag

eyes to attach the strap
Unfortunately, I was too sick to have much fun at the actual Halloween party, but now I have an accessory for carnival :)

I know that it's closer to New Years Eve than to Halloween, but I had this post sitting around waiting for me to upload the pictures for the last two months, so here it is ;)
Merry Christmas, by the way :)

Sonntag, 27. Juli 2014

How to enlarge sewing patterns using Inkscape

As you might have noticed by now, I kind of hate buying patterns, instead working with what I can find on the internet or my mothers pattern-making book. If you've read my post about the Stardress, you know how I usually enlarge patterns manually. But that's a lot of work, so recently I began to look at ways to enlarge patterns using my computer. What I found is Inkscape, an open source program to draw vector graphics. If you search for Inkscape on youtube etc, you'll find a lot of tutorials for all kinds of neat things, but I couldn't find a tutorial to enlarge sewing patterns, so here it is:
First things first, you don't need any fancy equipment for this, just the program and a mouse. I also suggest to watch one or two of the tutorials on youtube because you'll need to use the Bézier tool quite a lot and it's just easier to learn from a video. Ready? Here we go!
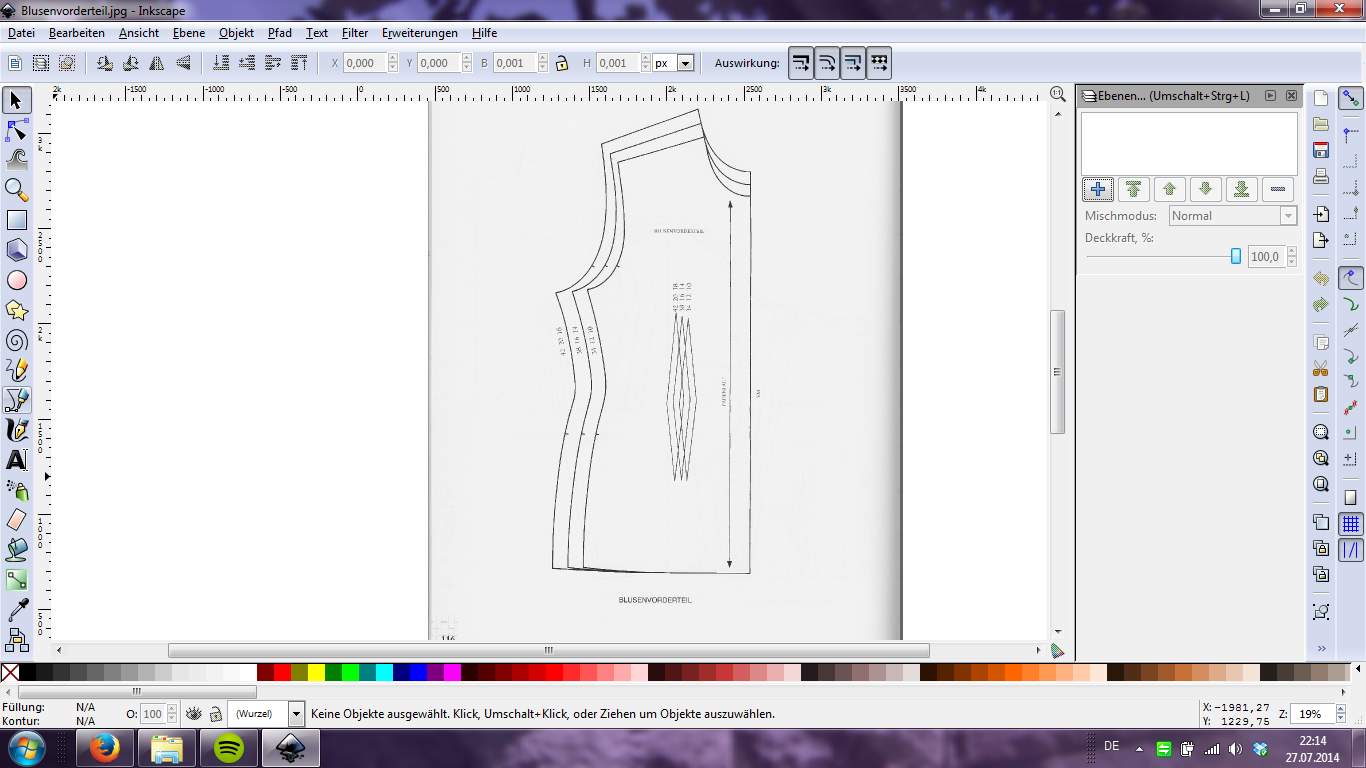
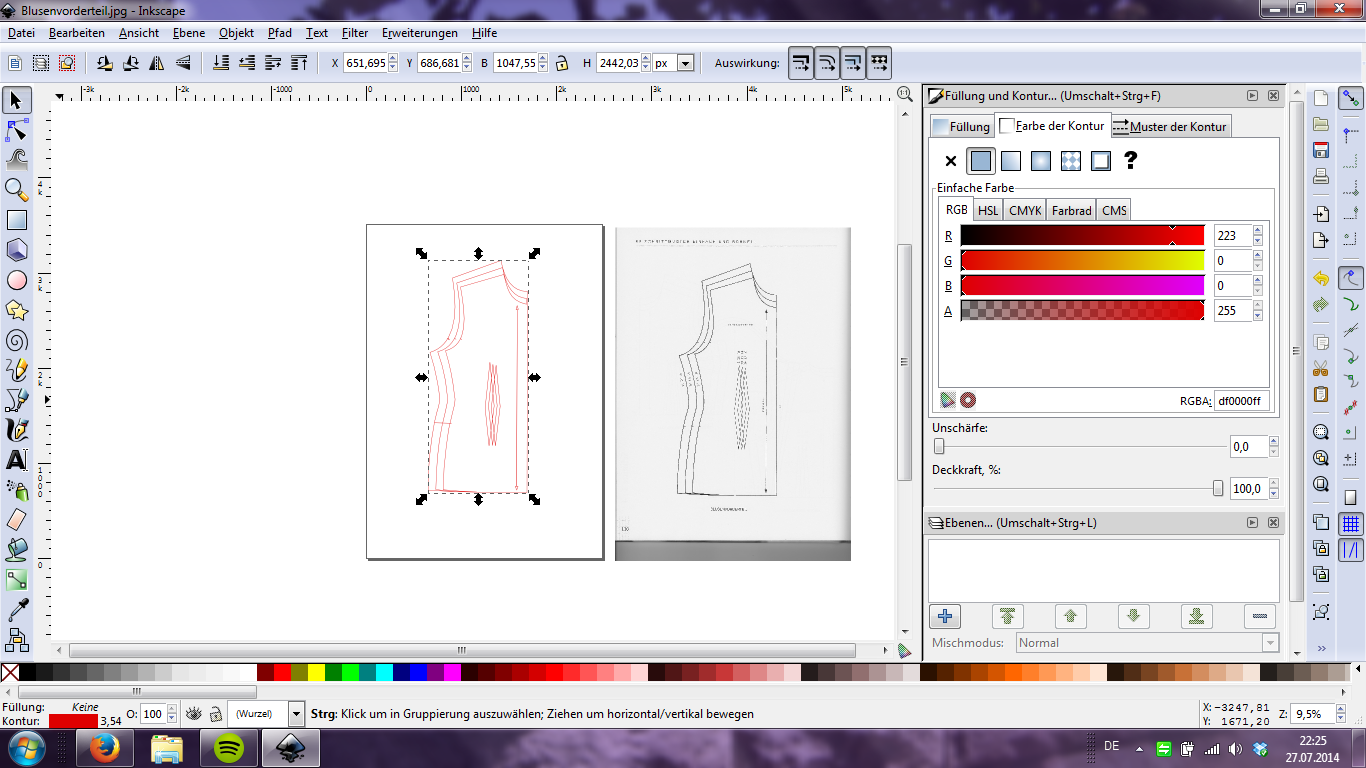
You'll need a pattern you want to enlarge first, of course. I used one of the quarter sized ones in the back of my mother's pattern making book and scanned it; for some reason, the scanner saved it at three times the size of the original, so I had to make some more calculations than normal, but as long as you know the ratio between your beginning and end point, you should be fine.
Open the image in Inkscape, I just click ok when it asks wether to embedd or do something else.
Please click on the image if it's too small ;)
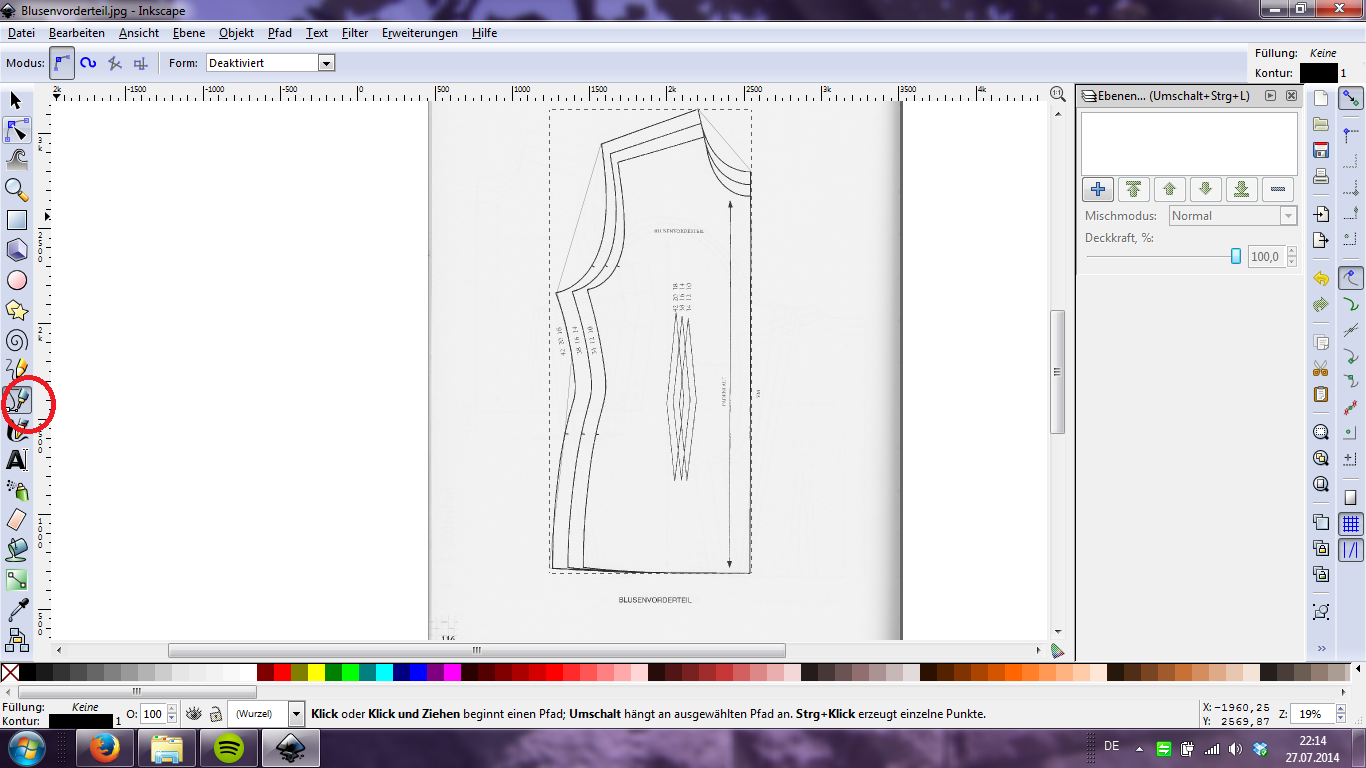
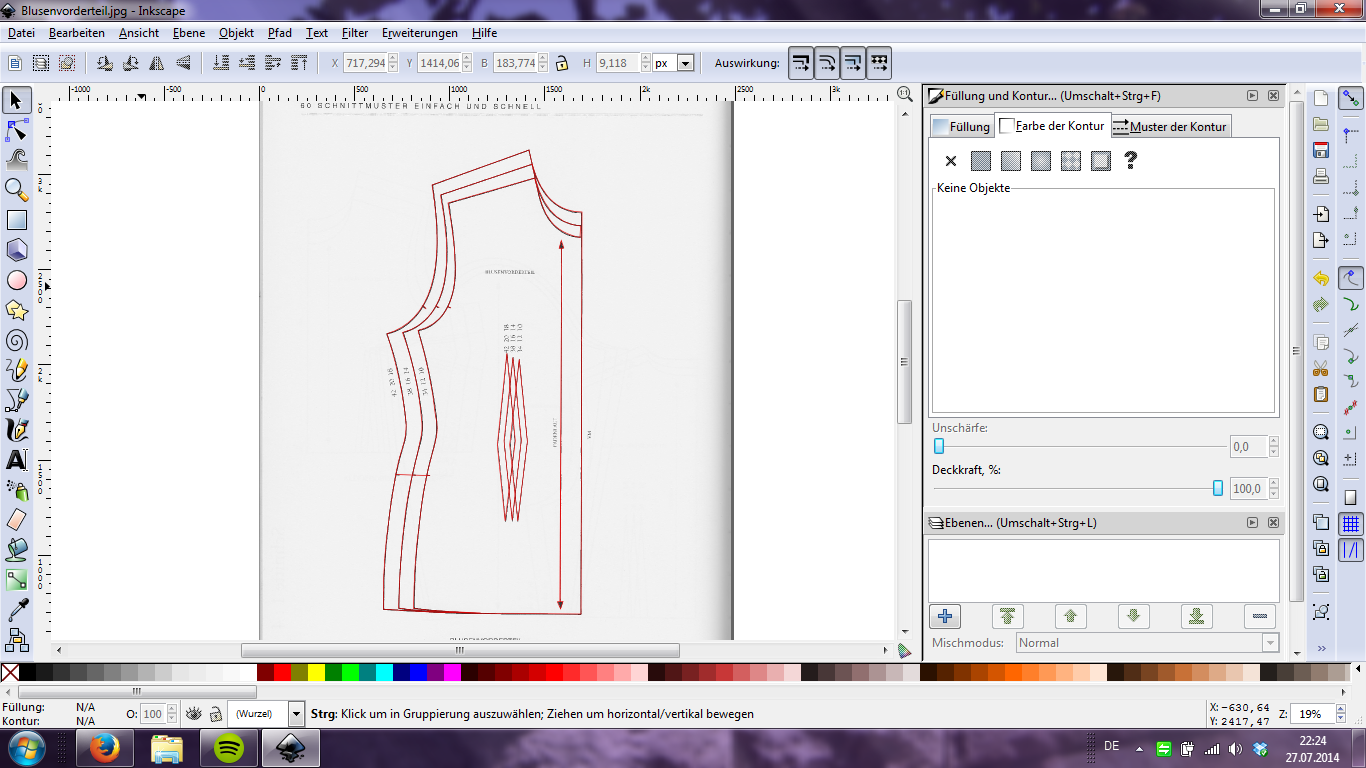
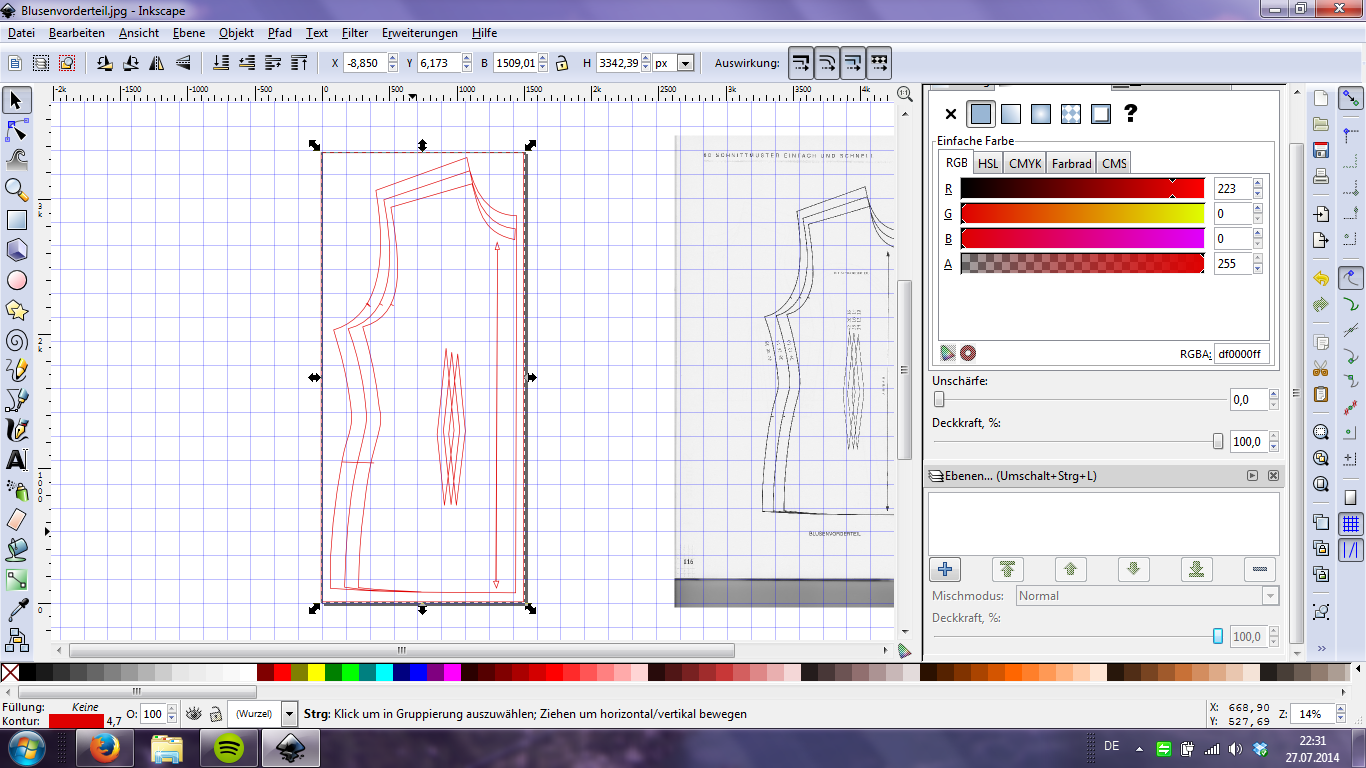
Then, using the Bézier tool, start tracing the pattern. I usually start with the biggest size and work my way to the smaller sizes, darts, grain lines etc. Make sure you trace everything you want to have on your big pattern!
The Bézier tool, in case you didn't watch any tutorials

You'll need this tool to manipulate the straight lines into curves;
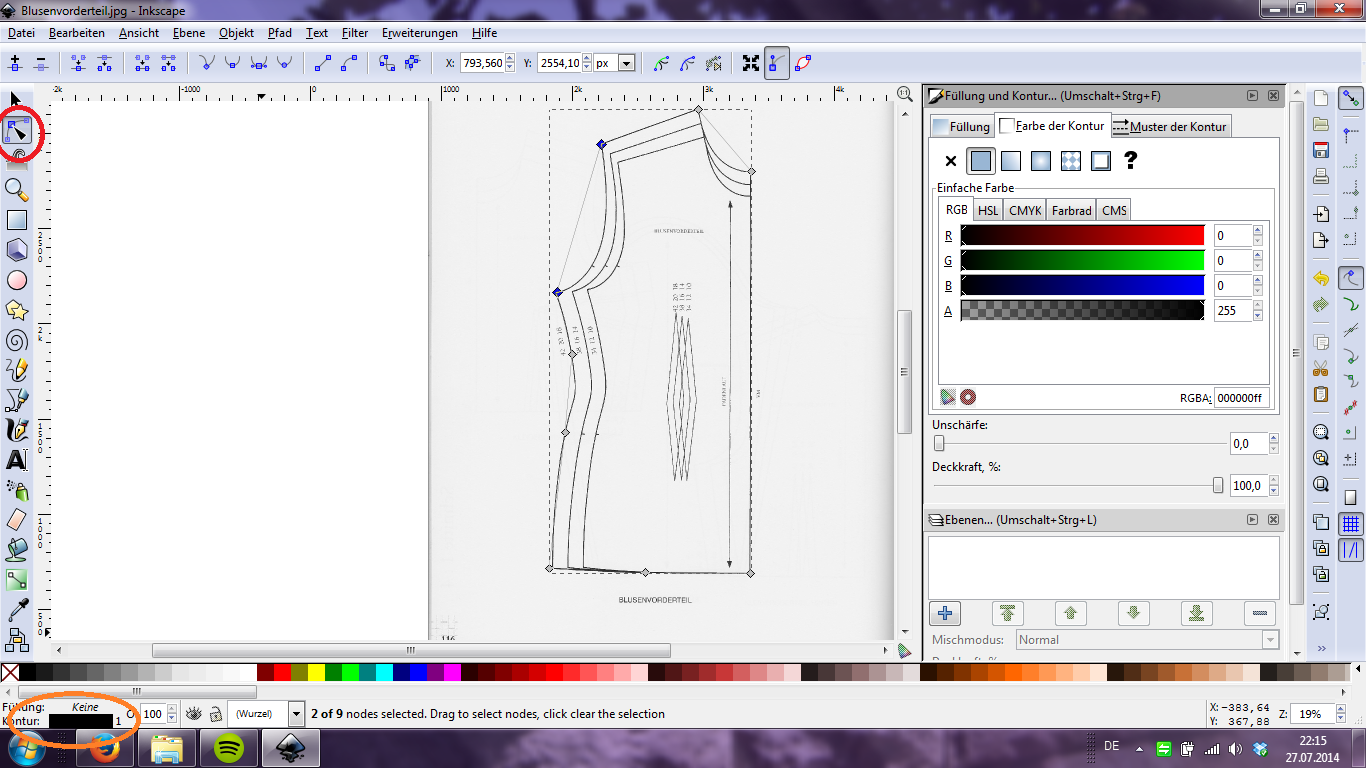
If you click here the window on the right side opens up

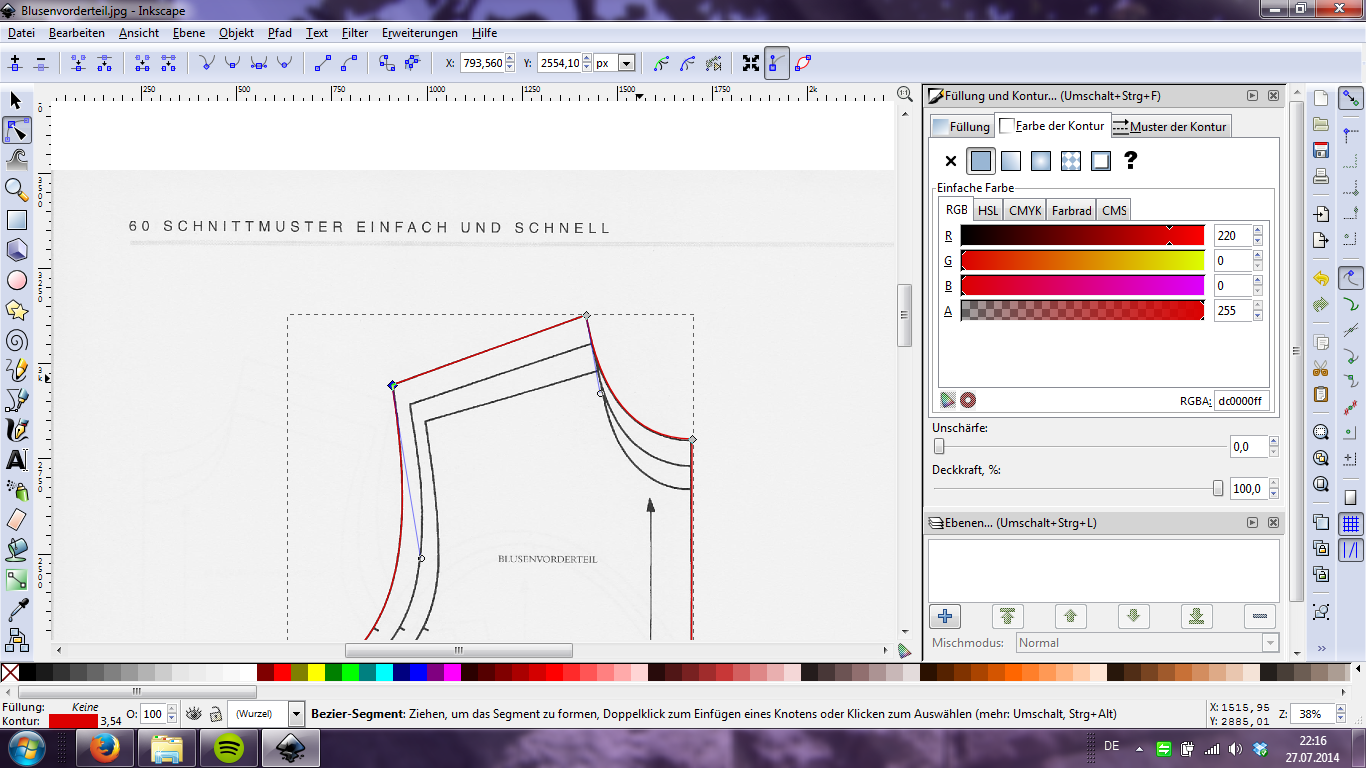
To make it easier on my eyes, I make all the lines red and 1mm thick using the window on the right side.
Work in progress...
...and all done
Now we manipulate our lines a little:
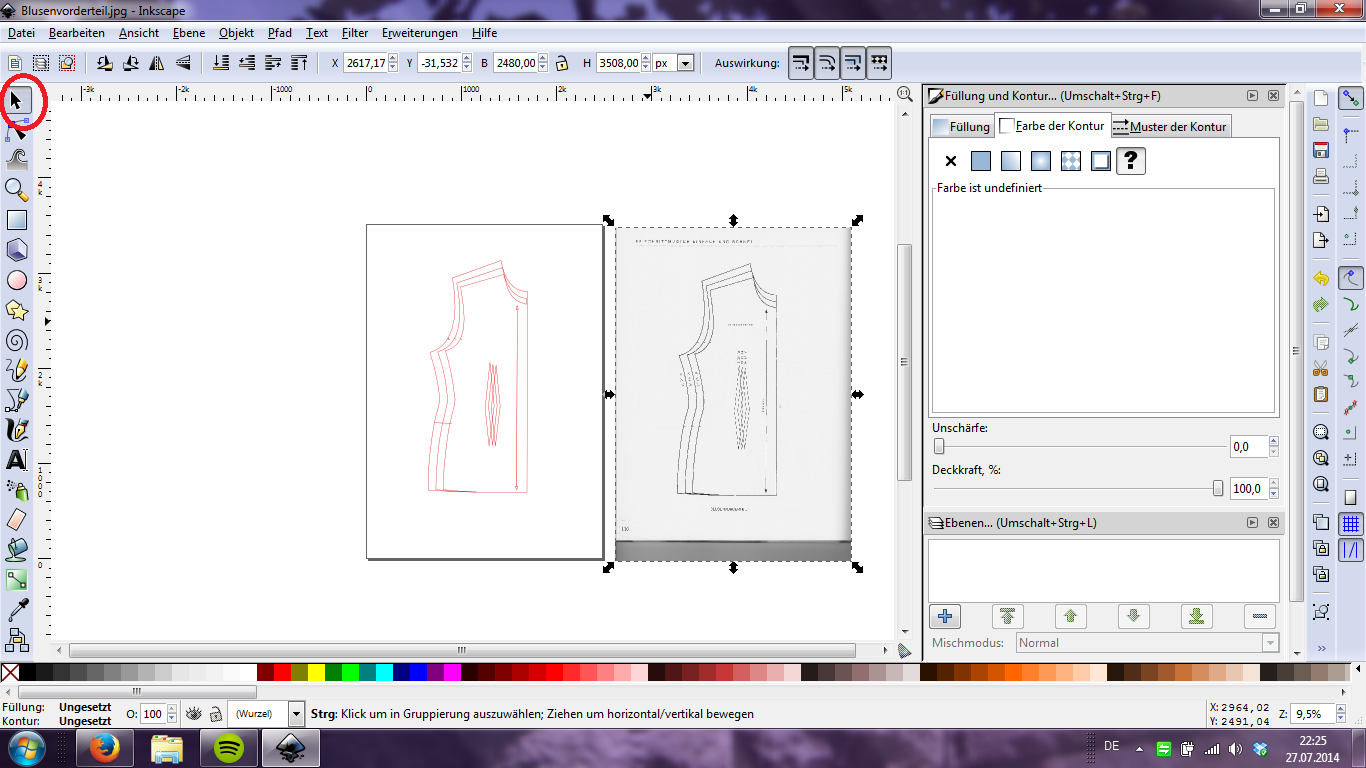
Using the selection tool, drag your background off the page.
We don't need that anymore! :)
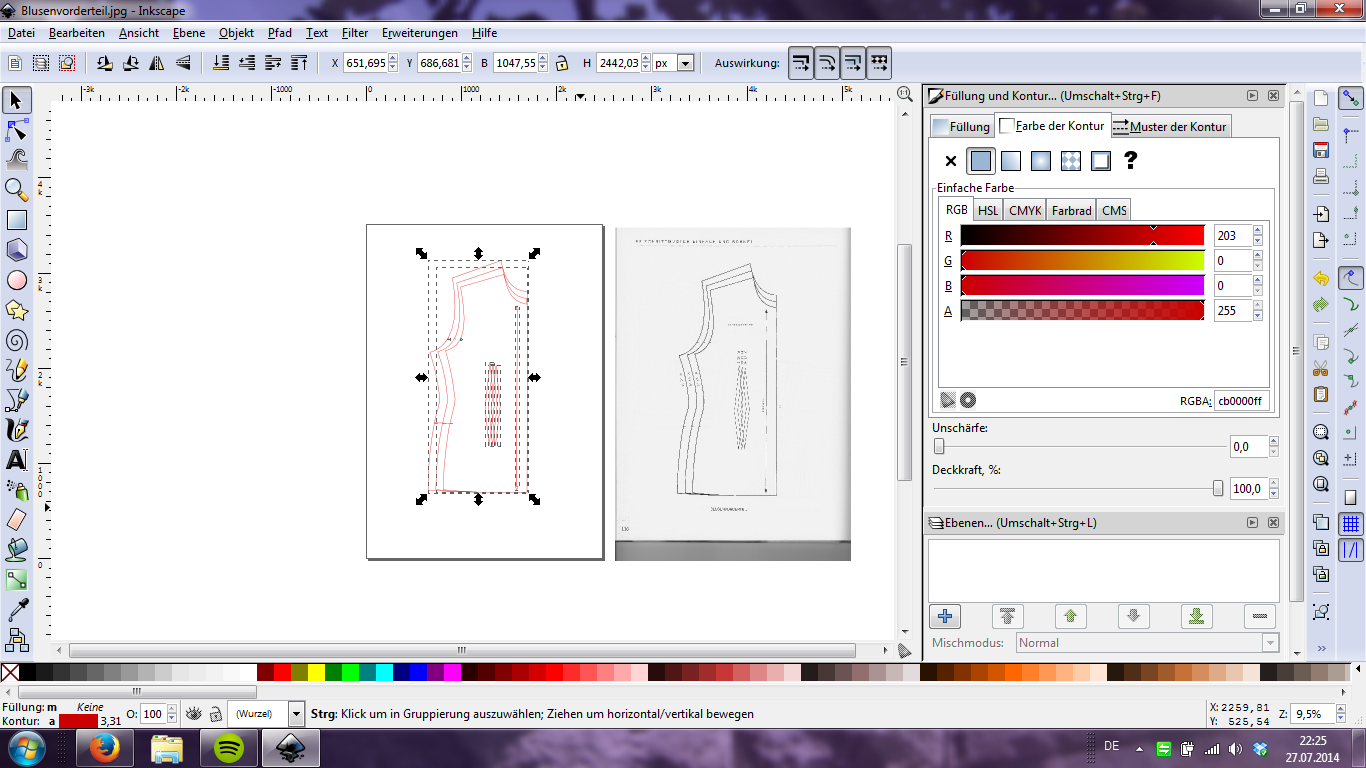
Select all your lines by drawing a big rectangle over all of them, still with the
selection tool
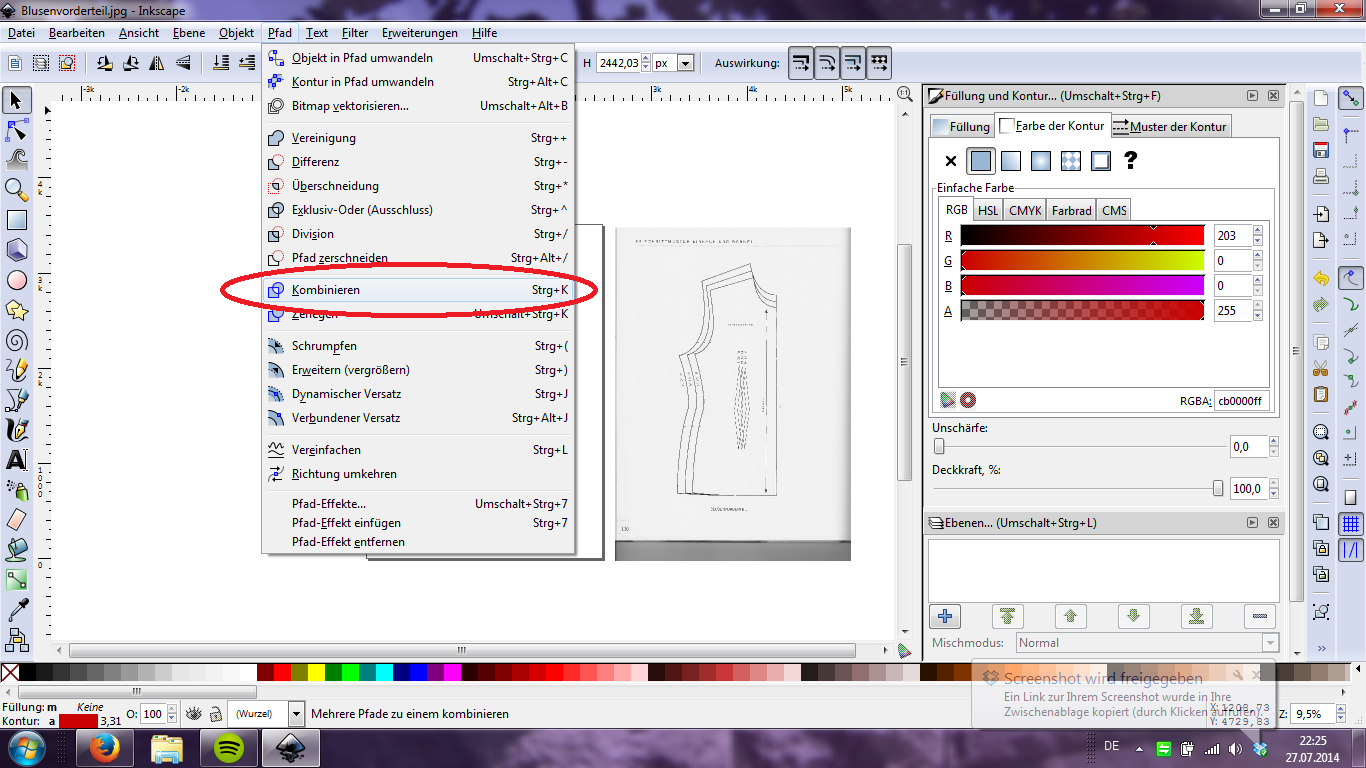
Now combine them, so you can move them all at the same time.
It should look something like this.
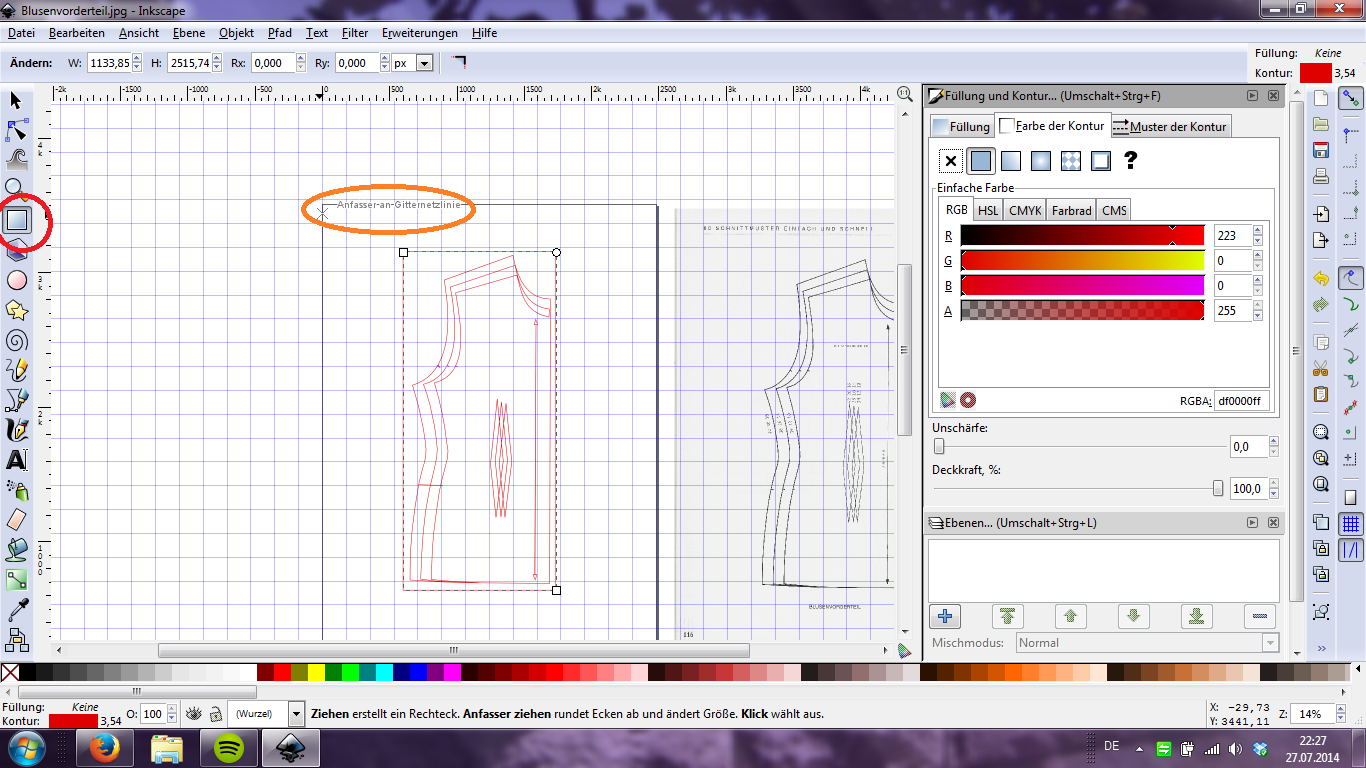
Now we need a grid:

I like mine to be a 1cm x 1cm grid, with thicker lines every 5cm for better visibility, but that's just personal preference.
When I have the grid, I draw another rectangle around the entire pattern.
This means that the edges "stick" to the grid, which is very useful.
 Make sure you combine the rectangle with the other lines like you did before!
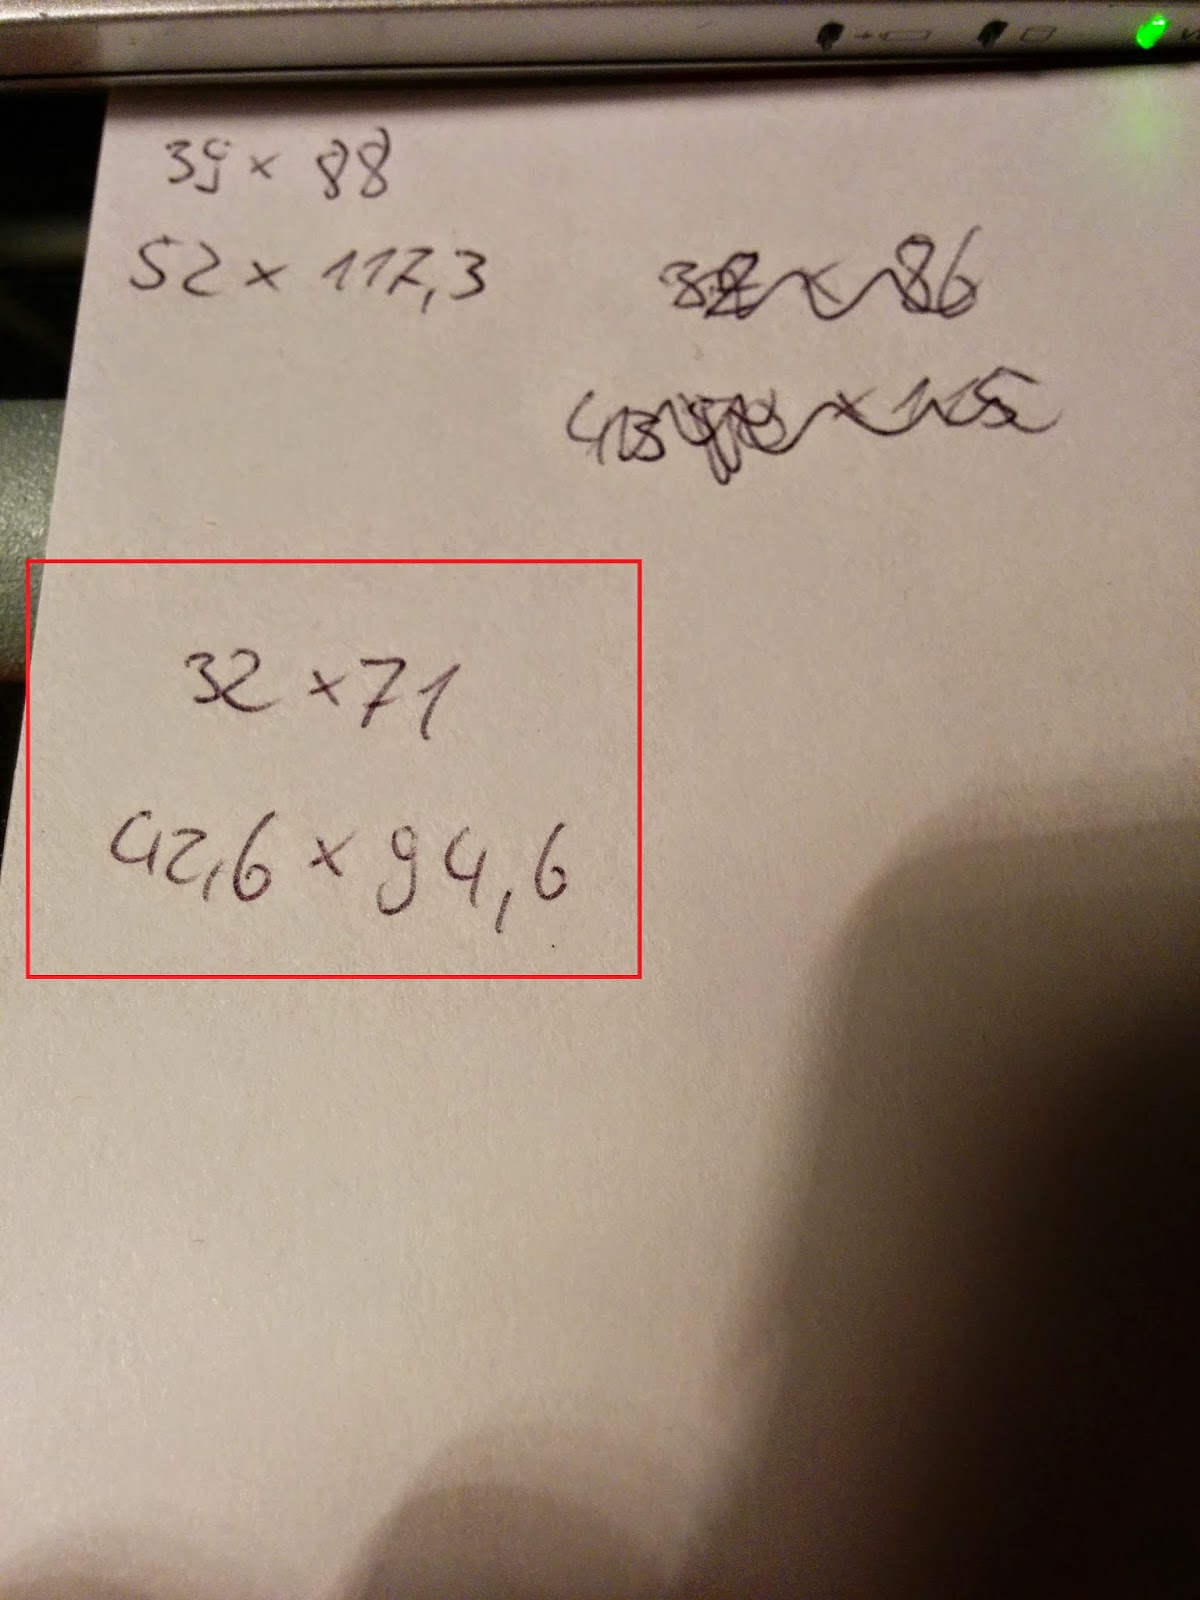
Now I count the squares within the rectangle, write them down and do a little math on them. This is where you need to know your ratio, my book says 1:4, but since my scanner for some reason saved the image at three times its original size, I had to divide by three and then multiply by four.
What, you didn't think that
this was gonna be entirely
digital, did you?
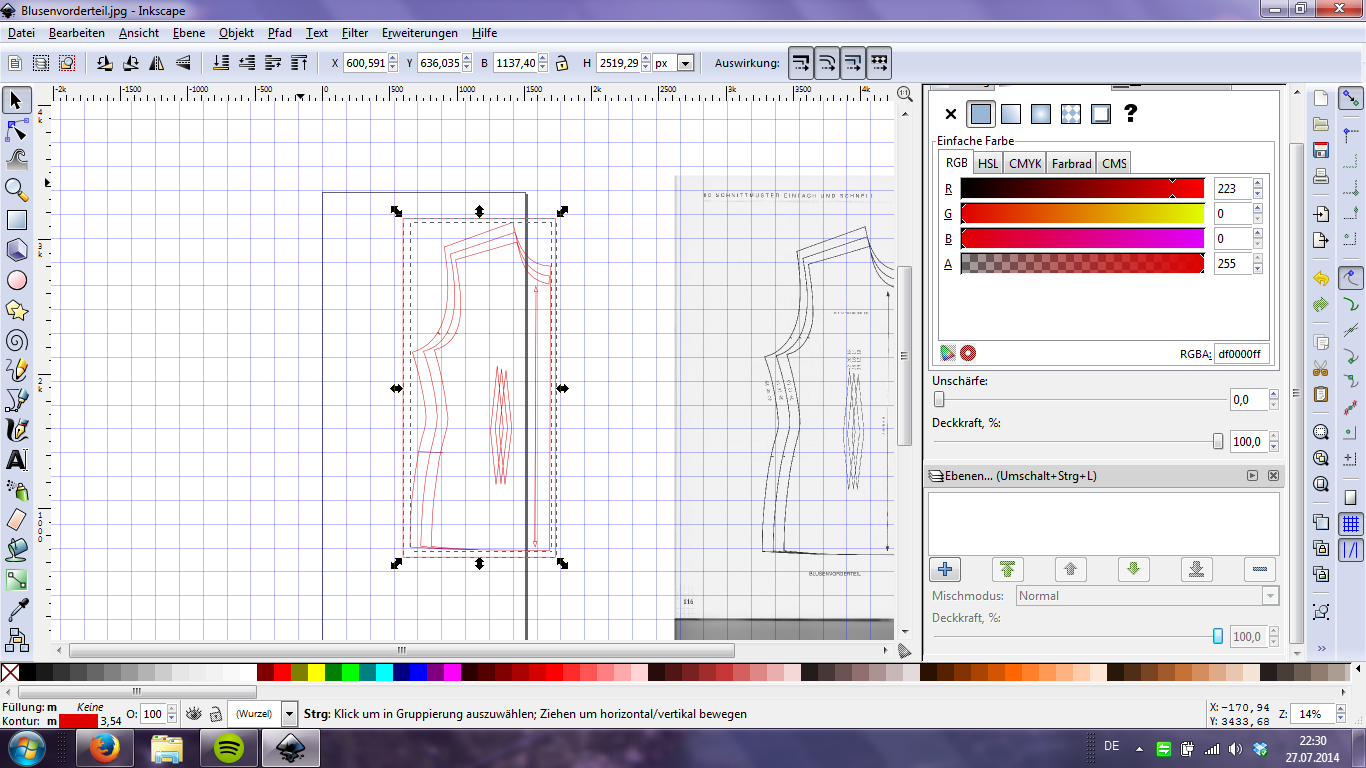
Using the same window where you found the grid settings before, you can now change the page size to your new measurements.
If it looks like this, you're almost done!
Now we're actually enlarging the pattern:
Still with the selection tool, move it to one corner of the page
And, keeping Ctrl pressed, pull on one of the corners until you meet the
corner of the page.
It pays to zoom in at this point to get all the edges lined up. Remember to keep Crtl pressed when pulling on the corner, or the width to height ration distorts.
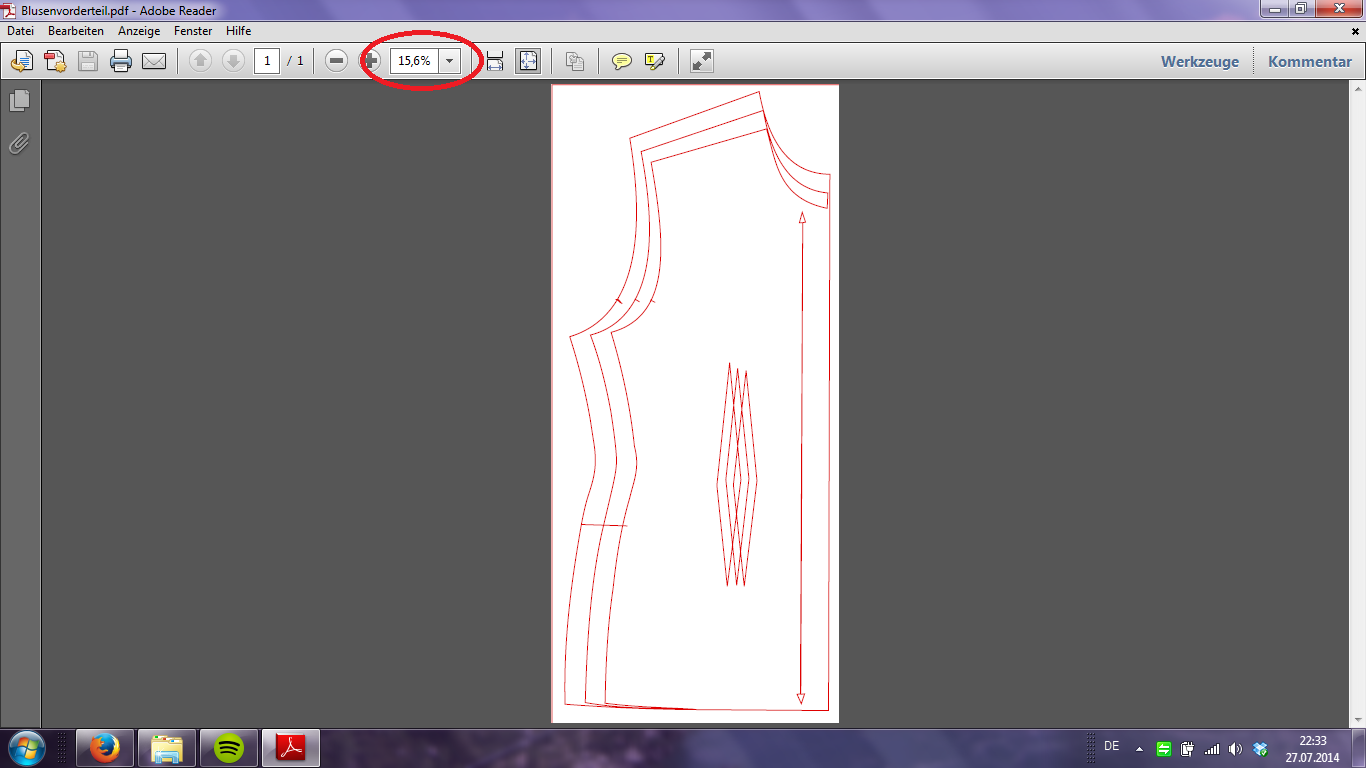
Okay, that's as far as we get using Inkscape. I suggest saving your work as an .svg file (the default option), so that you can come back and manipulate it further later on, if you need to. But if you actually want to print it out, I suggest saving as a .pdf file, using the "save as " button.
That's what my finished product looks like, note the zoom factor
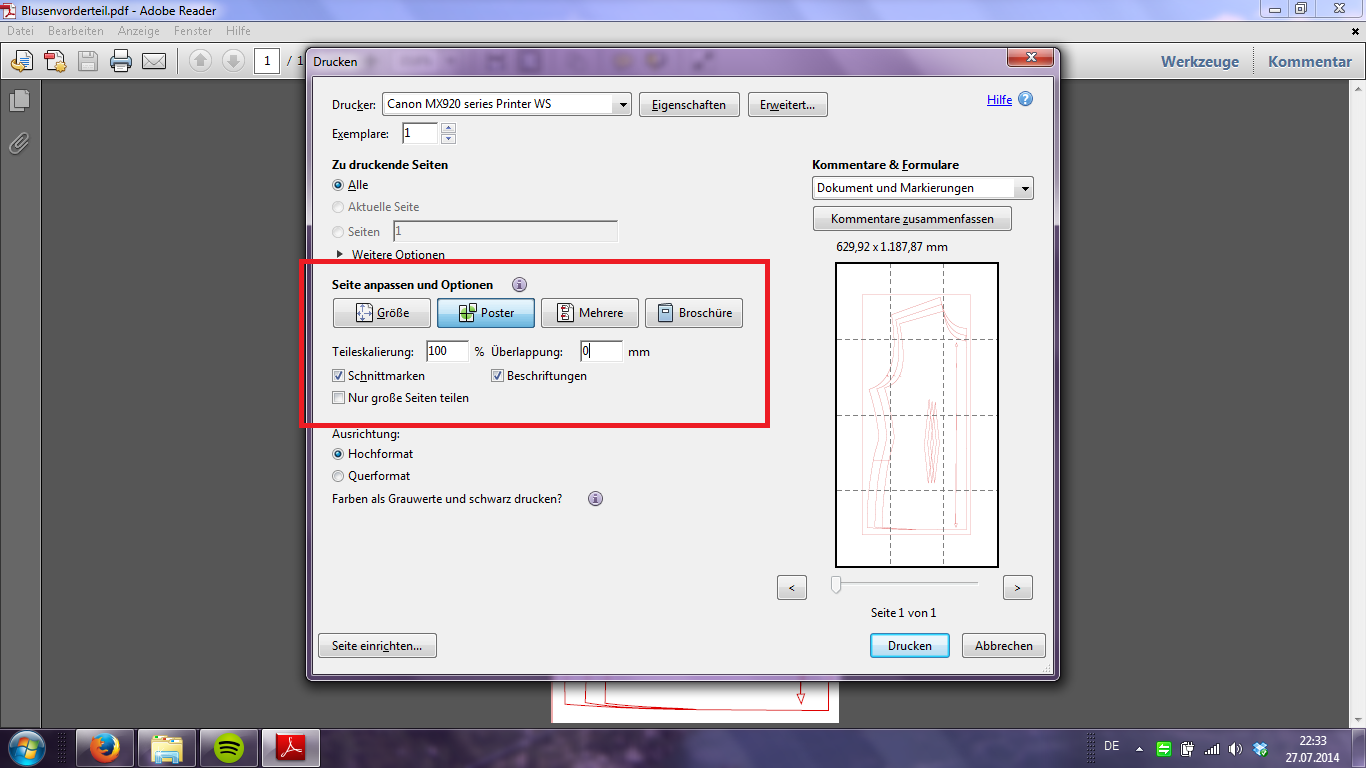
 One last tip, because I didn't know this before: you can actually print this out at home, using the "poster" button in your print menu:
You might wanna select some overlap if you want to glue it together later
I hope that this helps some of you, if you have any questions, shoot, but keep in mind that I too am still learning to work with this program ;)
Right now I'm working on converting all the basic patterns from my mother's pattern book into printable patterns so that I don't lose any time enlarging next time I want to use one of them.

Sonntag, 13. April 2014

What I've been doing lately...

Lace. Lots of Lace.
Pattern found here, scroll down and you should be able to find it. I love drawn instructions, so much easier to follow than written ones... In any case, the pattern repeats itself every four rows, so I knew it by heart pretty quickly. So far, I have about 5m of lace and still some yarn left, I kinda challenged myself to crochet the whole roll of yarn into one continuous strip of lace. I already finished all four seasons of raising hope while crocheting, so this is gonna take some time, but I like having an easy continuous project for things like watching tv, riding the train etc. I just have to see if I can make something cool/pretty/useful out of it when I'm done. Hm...
In other news, I have some plans for a shirt/tunic for the summer (fabric's bought, you'll see more when it's out of the wash) which will feature some embroidery. While I love the look of blackwork I don't feel up for counted thread embroidery on a finely woven fabric and even after some considerable time couldn't find a decent pattern (or any pattern, actually) for the later, more curved and freely flowing (floral) designs, I looked for other inspiration.
I've dabbled in Circular Gallifreyan before, but it's hard to do nicely by hand, so tonight I busted out the computer - and Paint. Really, I tried Gimp, but it just wouldn't give me a tool do draw circle shapes! Anyway, because I wanted it evenly, I drew 3 different sizes of circles and after that only used the copy/paste/move tool, the eraser and sometimes brush (for the dots). Oh, and the straight lines tool, because who the hell could ever draw a straight line with a mouse :)
I used the "A good man goes to war" poem from the Doctor Who episode of the same name, here's the first verse:
Don't worry about the writing at the top, I do know how to spell, it just helps visualizing how many circles you need when you write it out that way.
It was quite fun to make and I'll certainly do the rest of the poem as well. I think it would make a nice pattern as embellishment for collar, cuffs or hem of a simple white shirt.
That's all for today! Have a happy Easter, everyone :)

Edit: I did the whole poem! Yay!


Dienstag, 28. Januar 2014

Confession time

I'm really terrible at time management. (Just in case you hadn't noticed that so far ;) ) And since I'm writing some exams I really need to pass this February and March, I've put my sewing on hold until I've studied enough to feel secure of passing those exams. While I'm sure that, with proper time management, one could still pursue their hobby with a clean conscience, I am (as stated) terrible at that, so I don't think there'll be any sewing to write about until March. That also means I'll be behind on a couple of hsf challenges, although I had some really cool ideas for some of them. I'll probably make and post about these ideas anyways, and just won't enter them into the challenge ;)
To make sure you don't get bored while I'm on break, I'm planning a couple of informative posts, one about carnival ("Fasnet"), which is in full swing right now, and one about the bodice I have planned for my celebrations skirt. Stay tuned!