I'm going to a New Years Eve party tomorrow, and didn't have anything to wear. Wait, that's not right. I could have worn my prom/graduation dress (all in one ceremony here in Germany), but that's about knee length and a friend of mine wanted to wear her floor-length prom-dress without feeling overdressed. I had some lovely drapey/flowing black fabric given to my by my brother, who had used it to darken his home-theatre but took it down some time ago. I soon thought about making it into a ~1900 Skirt like The Dreamstress or Fashion through History, but didn't think I'd get it done before New Years, as I'm going snowboarding tomorrow and won't really have time to sew anything. But today at about 5pm I couldn't stop myself and started looking for patterns. From the diagram in Fashion through History's post I could tell that it didn't look too complicated, and amazingly googling "1900 skirt pattern" led me to this site. I looked at several of the patterns, my limited timeframe and my tons of free fabric and decided to make the 3 part skirt:
After measuring myself, I made it a little bit longer in the front by lengthening the center front line from 103 to 110 cm. To get even more flare in the back, I enlarged the rectangle from 118x112cm to 130x120cm. And confession time: While I drafted the front piece on a piece of paper and cut it out, I was too lazy to do so (and didn't have a large enough piece of paper without gluing stuff together) for the back piece and just drafted it right ontot the folded fabric. It worked like a charm (and lot quicker than the alternative, too!).
Due to my rush, I didn't stop to take in progress pictures, but I think the construction is pretty straight forward. I did have to fiddle a bit to get the waist to fit, but those were minor changes. I finished the waist with a facing and did the hem with a rolled hem foot on my sewing machine - thank god for rolled hem foots! (feet...?) I sewed on two snap closures by hand and bam - finished skirt (as long as nobody looks too closely at the inside ;) ).
I did a quick fotoshoot, but since the party is tomorrow, I'll probably get some better pictures by then. For now, you get this:
I just love how much fabric is in the train, I can easily pull it up and pin/tuck it to my waist for when we're going outside to shoot fireworks at midnight :)
And since this is literally an item made for a celebration, I guess it fit's the HSF challenge number 26: Celebrate!
The Challenge: Celebrate! (a ~1900 three part skirt for New Years Eve)
Fabric: Some synthetic my brother used for darkening purposes in his
home cinema. After he took it down, he gave it to me, but he couldn't
tell me what it was, just that it had been cheap
Year: it says 1908 somewhere on the website, but I didn't have time to
find out if that year applied to my pattern as well. Somewhere around
that time in any case
Notions: thread, two snaps -> stash
How historically accurate is it? Not at all. It's historically
inspired, but sewn with techniques I'm pretty sure they didn't have in 1900 (rolled hem with a zig-zag-stitch, I think not :D) and the fabric is wrong. Hours to complete: Two or three, including drafting the pattern. Wow, that went quick!
First worn: Today for some pictures, tomorrow for the party!
Total cost: It's all from stash, so FREE!
I will probably use this for a more historical costume some time, but
for now I only have my modern clothes to combine with it. But even
though the design of the skirt and the rest is more than a hundred years
apart, I think they go pretty well together!
Argh, where did the time go? That's what happens when you always start two new projects while still working on the first... Anyways, while technically a day late, I finished my shift pretty close to on time despite my sewing ADD. Look here:
This is me without a dress form or a self-timer.
I didn't use a pattern but rather just cut out a couple of large rectangles for the body, smaller rectangles for the sleeves, two squares for the underarm gussets (I made them 15 * 15cm, that worked pretty well) and two triangles for the hip gores/godets/gussets - you know what I mean.
In my last post (about the shift) I showed you the sleeves and my beautifull flatfelled seams - turns out, if you flatfell your sleeves and forget to double-check which side is right and which is left, you end up putting in a sleeve inside out. Not sure if I'm gonna fix that, though, because as I said, you can hardly tell it's the wrong side, plus it would be a lot of work for a piece of underwear that's not even supposed to be seen. So the armholes are the only seams that aren't finished while everything else is flatfelled. I did the shoulder seams last (for no particular reason), so here's the only other time I stopped to take a picture:
Calculating, drawing and cutting the neckline. I bound it with bias-tape which doubles as a casing for the drawstring, which is some Dollarstore Polyester-ribbon I had lying around. All in all, I'm pretty pleased with my first entirely handsewn (!) garment:
Just the facts: The Challenge: One Metre Fabric: 1m of white cotton Pattern: squares, rectangles and triangles Year: 1800 +/- 10 years Notions: white bias tape and white poly-ribbon from stash, white cotton thread also from stash How historically accurate is it? Completely
handsewn, but wrong fabric for the era (I think linen would be
accurate) and the poly-ribbon... so let's say 50%. Then again, it's
underwear, so as long as my hypothetical time-travelling self doesn't
get undressed in public, I should be fine. Hours to complete: at least 3 movies and 8-10 Futurama episodes, so that makes... about eight hours over two weeks First worn: half an hour ago for the bad cell phone pictures Total cost: I think it was about 5€ for the fabric, everything else was from stash.
...is not my forte, appearantly. Alternate title: Hey look, my quilt's got a little window!!
I did not see this coming. Probably because I had that part covered in my construction sketch. So I did just that, cut and ironed the green square and sewed it on top. Phew, there you go:
Before that, I had actually assembled all the patchwork pieces, but since that was just a case of pinning right sides together and sewing straight lines, I didn't take any pictures.
Simultaneously with the green square I cut two green circles - cut a green square, fold and iron it in half, fold and iron that in half and draw on a quarter circle with the center where all the folds meet. While I folded under the edges of the square twice, I tried two different things with the circles: for the smaller one, I folded under the edges twice, which was really a pain to iron/pin and looked all wonky while not attached yet. So for the bigger circle, I just ironed the edges under once, then pinned and sewed both circles to the base to see if they looked different, and if yes, which one looked better. I couldn't tell any differences, can you?
If you are confused now, congratulations on your exceptional visual memory! For everyone else, here's the design sketch for comparison:
Yeah. I rushed the sewing (and pinning etc) for the last circle, as my mother wanted me to clear the table off my sewing things and set it for dinner, so I somehow placed it into the completely wrong corner. Ugh. Thinking things through really doesn't seem to be my forte today. And while I'm not a perfectionist, I really liked my original design, so I put in a good movie, took out my seam-ripper and took the damn thing off. Pinned it in its correct place, took out a needle and some green thread and handsewed it back on (really too much effort to take out and set up the sewing machine again for one small circle...).
Oh, and speaking of realizing stupid, but fixable mistakes: When sewing on the border strips (labeled A & B in my sketch) I realized they were each missing 30cm. I have no idea where they went or rather what I was thinking when I cut (well, ripped) them out, but as most of these borders will be folded over to the backside, I don't sweat it. Because, really: I am done with the top part! Which means no more sewing machine for this project, which in turn means I can take it to my appartment (along with the tablecloth that will serve as backing) where the batting has been lying idly these two months, I think, and begin with the quilting. Yay! :)
This week I took some knitting and handsewing with me, and while I made some progress, I probably could have gotten a lot farther if I hadn't brought my new guitar with me as well. As it is, I played until my fingers hurt and then didn't feel much like sewing anymore, so here's the little I have done:
I used graph paper to figure out if this would fit for the "One Meter" challenge of the HSF, and it did! While it doesn't look like it in the drawing, my fabric was actually 10 cm wider than the 140cm I had calculated with, so I had enough left over to cut underarm gussets without touching the two long rectangles in the upper right corner that are now meant for hip gussets (gores...? You know what I mean, and if not, it will all make sense in time :) )
In any case, that means that I have to have this done by the deadline sometime in december,
which should be doable since the stuff I did so far went together pretty quickly.
I made a sleeve! And it only took me a couple of hours! Even though I made flat-felled-seams, can you tell?! This is the first time I have successfully sewn flat-felled-seams, I'm so proud of myself :) Still gotta hem it, make the other one, make the body, attach the sleeves etc, but so far it's a good start :)
And in case you were wondering, how the hell buttoned legwarmers were supposed, wonder no more:
One down, one more to go. I really love the colours :)
You'll hear from me next week, until then :)
No, this is not another Halloween-post, the title comes from German colloquial speech where you can refer to something very big as "Monster-whatever it is you're referring to". (Also "mammoth-...", but that's beside the point.)
The other reason I chose this title (besides teaching my non-German readers about the intricacies of German language) is because it always reminds me of this song, which in turn always cracks me up:
(If you don't speak German but feel that understanding the lyrics would make this song even more awesome, message me and I'll translate it for you ;) )
My very own monsterproject is also my very first quilt. Okay, scratch that, i did make a small patchwork quilt that now hangs on the wall above my bed, but that doesn't really count; also I didn't have any batting for that (and didn't want to buy any) so I cut apart a very cheap and very synthetic Ikea blanket. Well, it looks nice enough for decorative purposes, which is all I ever wanted.
I chose to make a quilt because
I find them fascinating
I wanted a project for winter that would keep me warm while I worked on it
and you can never have enough blankets.
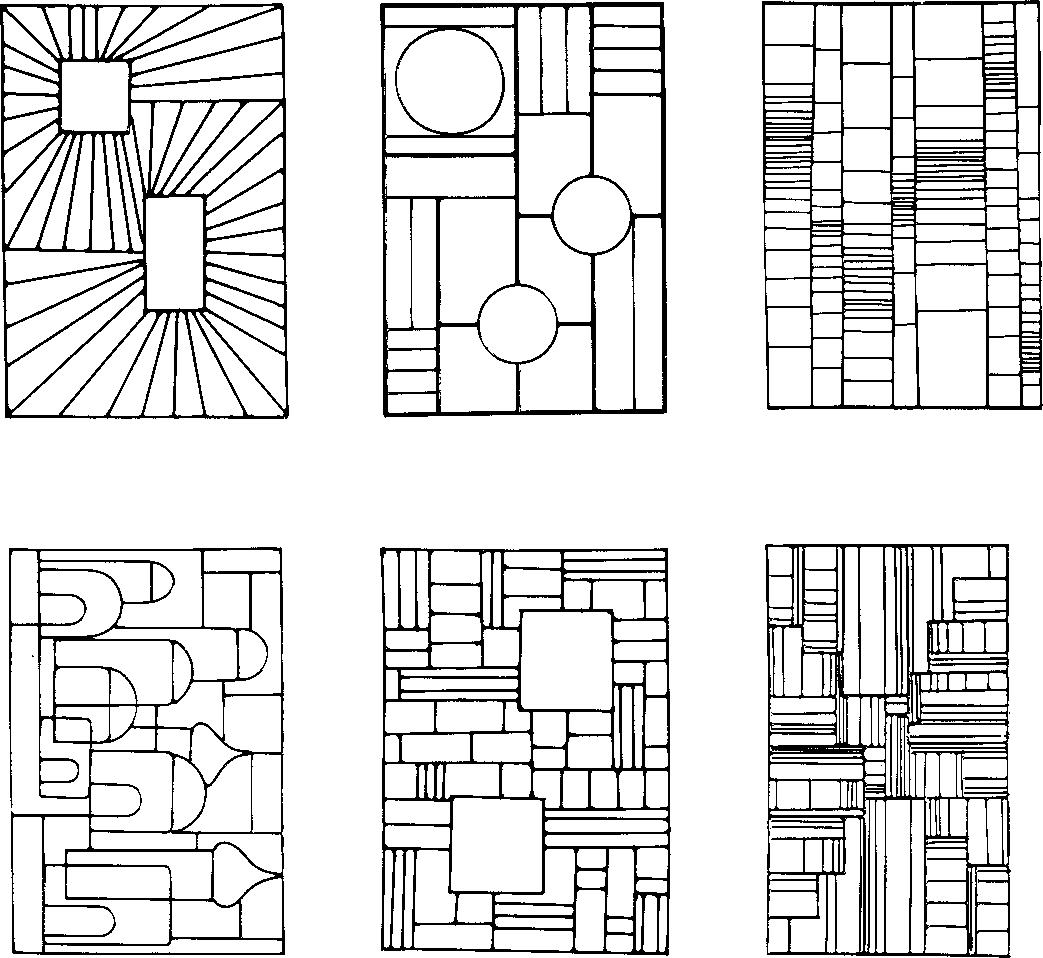
I wanted to make this one bigger than the first small one, so I decided to make it blanket-sized: 1,5m*2m. At first, I didn't want any patchwork at all as this seemed so chliché (and I was afraid I'd mess up all the tiny joins etc), with all visual interest coming from contrasting quilting stitches. But trying to find a pattern that would cover the entire area, not be too complicated to stitch and still be pretty, I googled "geometrical patterns" and came across this:
I especially like the one in the middle of the upper row with the circles, although i think the one in the top-left corner would also make a beautiful quilt for a more skilled seamstress (btw: is there a masculine version for that word?)
Because that would have been a little too much patchwork for my liking, I drew a simpler version: (and coloured it with pen. Sorry. All my coloured pencils were in my apartment.)
Thosse numbers were for figuring out how to combine the different colours without any overlap
I decided on a colour-scheme (blue, because most of my bedclothes are blue which in turn is because appearantly I just like that colour in my room ;) ) and calculated and drew how much fabric I needed in each colour.
In case you were wondering why i wrote "drew"
Since I wanted my quilt to be usable for a variety of things ranging from "picnic-blanket" to "extra warmth in bed in winter" I wanted it to be washable and without any synthetics. I went to the gigantic fabric store in my town and got the batting, but they didn't have all that I wanted (colour you want - quality you want - quantity you want - choose two) despite being so gigantic. I guess my wishes were just too uncommon. (Come on, people: simple, unicoloured cotton in lengths longer than one meter? Who would ever buy such a thing? -.-) So in order to get the whole bunch of fabrics from one place to ensure their weight and drape and quality and what have you went well together, I ordered what I needed online. Aaaand forgot the backing, who would have thought. Luckily, my mother offered that I could use one of our (or my late grandmother's?) old tablecloths, since we never use them anyway. I found one that should fit both the colour-scheme and size, but have no idea what kind of a fabric it is. It is heavier and sturdier than the cotton, but, being a table cloth, should be washable. Also it would make the entire quilt/blanket more robust, so forgetting to order two metres of fabric might even turn out to be a blessing in disguise! (It's certainly the more environmental- and wallet-friendly version, recycling old table-cloths!)
I did (after washing and drying and letting it sit in my room for a week) manage to cut the pieces, here's what the actual thing will look like (kinda):
(without the border, or appliques, or topstitching...)
Now I'll have to sew them together, but i kinda dread the complicated looking cross section in the middle... ah well, it will be covered with the green square in any case, so If I mess it up, nobody'll know! :) Until I have the top part fully assembled, this will be a weekend-project for when I have a sewing machine. For the weekdays, I have two projects that I will talk about (and show pictures of) in another post:
Buttoned legwarmers (I adore legwarmers, but curse everytime I have to pull them on over shoes and jeans and whatnot)
A regency shift (I really don't want to sew underarm gussets with a sewing machine, so that will be a nice litte handsewing project.)
Why yes, I still exist! Quick explanation: After reassesing my priorities this fall I've put "University work" (as in: the thing that determines the strongest how I'm gonna work and live in the future) in its rightful first place - with all the consequences. So while I'm amazed at a) my newfound love for my chosen subject of study and b) how interesting lectures tend to become once you actually follow them, there isn't a lot of procrastination by sewing going on right now. There is (and will be) plain old planned sewing further on, but not yet anything blogworthy.
Instead, looking back and looking forward.
Looking back:
I don't have any pictures of my finished Halloween costume, since we were running out of the door to catch the bus the minute I finished everyone's make up. I do, however, have some in progress-photos:
I had bought a box of rubber spiders and sewed some onto the white shirt I made the week before. As you can see, I started off by pushing the needle through the soft body and then backstitched over each of the legs where they joined the body. Unless you look very closely (like, with a magnifying glass) you can't see how they're attached. yay :)
This was (besides curling and putting up my hair) the most uncomfortable and time-consuming part. I had bought artificial spiderwebs (maybe 2€, I was surprised at how cheap it came) and just pulled them apart and put the pieces on different places on my body, then sewed on the corners while wearing my clothes. That meant 20 to 30 times tying a knot, sewing four or five stitches in the same place, make another stitch where your needle comes out a couple of centimeters away from your stitches, cut off close tho the surface, repeat. All this while balancing and turning in the strangest positions, because my body is kind of three-dimensional and I didn't want the cobwebs to only be in the front. (I admit I had help for the shirt back as this was just not doable with my level of flexibility, but that was only three corners). Btw: I made sure not to fix any of the upper-body-cobwebs to my pants and vice-versa as I still wanted to be able to go to the bathroom.
Since "something with spiders" is mostly not an accepted costume-description and I wanted to be able to shout* something short and easy when people ask me what I'm supposed to be, I went with "ghost". To make it easier for people to recognize (and because my family had seemed very sceptical when I showed them the unfinished prototype) I went with some facepaint. On this cheat-sheet I tried out different approaches: bangs pinned up or down, partly or entirely skeletized, coulours etc. I eventually went with the option on the bottom left and even had time to do some makeup for my two companions (a zombie and a... dead confederate soldier...?)
*clubs are loud, remember? Not the best places for long conversations about complicated costumes
As I said, that was when we had to run in order to catch the bus. So the only picture I have of my makeup is from after a night of dancing and drinking (through a straw, but which nonetheless messed up my makeup a little). It must have been kind of impressive, though, because when I went to get a drink from the bar the person in front of me gave a real jump upon turning around and seeing my face. I told them that that was the best compliment I could have received for my makeup ;)
Aaand that's it. The spider shirt is still in the wash (I had a lot of drinks spilled on me, plus some fake blood) and sewing on all that cobweb was just too time consuming to put on again for a photoshoot, not to mention the makeup. I'll post a picture of the shirt with the spiders and then you'll just have to put everything together in your heads ;)
I any case, I had a lot of fun. How was your Halloween? Did you go out? Did you wear a costume? What was it?! The comment section is all yours ;)
Looking forward:
This thursday, there's a big party by the psychology department of my university. The motto is "Bad Taste", but I have some issues with that. The problem with dressing for bad-taste parties is that you either take the motto to heart, arrive badly dressed and look terrible all night. Call me vain, but I don't like looking terrible. The other option is to honour the motto by using items that yould be described as being "bad taste" but putting them together in your style and to your liking, thereby looking good (by your own standarts). I did that last year, putting on a whole lot of pink and neon colours into a fun and colourfull outfit, and had people complaining that by making myself look good I hadn't understood the meaning of "bad taste". So this year, instead of going into a whole discussion on how I feel that bad taste parties allow us to wear and combine items more over-the-top than what we usually wear, thus not necessarily forcing us to look bad, just different, I decided to do something completely different. Enter the Rorschach shirts!
For those of you who only know the comic book character of the name, Rorschach Tests are projective tests claiming to find out something about you personality by analyzing what you see in different inkblots. I don't think many serious psychologists still use this test, still, there's a strong association in "the public's" mind between psychology and inkblots.
In any case, needing something to wear for the party was the perfect opportunity to try out this video:
(And yes, I have been watching threadbanger these five years and still watch any new videos they make. I think you could consider me a fan...)
So on saturday my roommate and I bust out the t-shirts, cardboard and acrylic paint and made our own (more colourful) designs:
This is probably what I'm going to wear.
It was a very fun project with amazing results, so depending on how they behave in the wash I'll almost definitely do something like this again. The only annoying part was how looong the paint took to dry, but that's what happens when you put it on so thickly.
Oh, and because the psychologist in me can't resist asking this question: What do you see in these three pictures? Please leave a comment! I'll even start: 1. The green and purple one: I see a Lion's head.* 2. The black and green one: A goblin with very short arms and very long legs 3. The colourfull one: A South-american poison-dart-frog.
*My brothers said they see a naked woman. Now I can't unsee it.
Heeey, Halloween's coming up and guess what: I'm actually making a costume! Well, the making part is over, but I've got to buy some things and put them together to finish it. Here's a sneak peek, though:
Oooh, and did I tell you I got a new mannequin? :D
I first thought I'd make a '20s dress, with a beaded, black net overdress and a green slip (which I could have used as this week's hsf entry, too) but decided it would be too much work. Plus, as Halloween isn't that established in Germany, you usually dress up as something scary if you dress up at all, or people tend to give you funny looks. As I said before, people in the south mostly dress up at carnival, and that's where you get out the funny (or just about any) costumes. (Unless you're in one of the quilds, they can have some pretty scarycostumes...)
Another cool thing about the south? Living in a mostly catholic state (I'm talking federal state here, not Germany itself) we get All Saints' Day off - the day after Halloween. (There's also a ban on dancing on All Saints' Day, so the club might be shut down by the police after midnight, but usually the music's just turned back on when they leave after a couple of minutes ;) )
Okay, enough about the culture, back to the costume: so I wanted something scary. And I really don't remember how that idea cam into my head, but sometime last week I found myself thinking: "Hm. Something with spiders..." And went on from there. A couple of considerations that went into planning:
I am planning to go to a club with my friends, so I need something I can dance and move through crowds in. That means: no big wings, no trains, nothing too warm
Very little sewing. I'm back to only having the sewing machine on weekends and when I started to plan only had two weekends that I also didn't want to spend entirely at the sewing machine.
Money! I had just spent a lot of money on fabric for another project and wanted to do this with as little expense as possible.
Another reason for me not wanting to buy fabric unless I absolutely have to is the appearant lack of acceptable fabric stores close to where I live. There's an Ikea that has bad quality fabric with strange prints, a small mercery store downtown that seriously looks and feels like someone just cleared out their grandmother's attic and is selling everything they found there, and last but not least a gigantic fabric/quilting/crafting/everything that I can easily spend >50€ in without buying any fabric, but that's more than an hour away from me by public transport - the only transport I can use there.
Um, where was I? Ah, yes, the costume. Can you guess what it is? I will have to try some things out before I decide on how to style it eventually, but I can't wait to show you the finished result! :)
Some production pictures:
I made the pattern from adjusting and tracing one of my tank-tops. Didn't take into account that its jersey and stretches, which inevitably came back to haunt me later.
Tracing the pattern (the top) and some construction (the bottom) onto my very flimsy fabric. If it hadn't been just for a halloween costume I would have made a proper pattern and actually pinned it onto the fabric, but I was too lazy and didn't want a too clean look anyway.
I folded along the center fold line after tracing one half, and that's when I started pinning. Cut one piece out and...
...used it as a pattern piece for the other side. More pinning!
Pin all the fabric!
Did I mention that I hate pinning?
The two sides pinned together. Pretty basic shape.
I had this idea that I was gonna flatfell all the seams, but gave up after the two shoulder seams. (note: synthetics don't iron well. Also, quick and dirty Halloween project.)
I simply shortened the seam allowances, finished them with a zig-zag-stitch and ironed them to one side. As this is gonna be a club costume, I hope my legs will distract from my messy sewing.
(We just reached the usual point where I'm so engrossed/frustrated by my sewing that I forget to take pictures.)
Because I've done so successfully (on a flimsy fabric) before, I used a rolled-hem-foot (successfully!) to make a ... rolled hem. I was literally sitting at my sewing machine going: "yay, something works!" :D
I had some fun with the left-over fabric while taking the "finished" pictures, but that's it so far. Stay tuned :)
If I do something (especially for someone else) I try do do it right. So when my father asked me a couple of weeks ago to devise some kind of bag for our camping-cutlery, I knew two things: firstly, that this could be a very quick and easy project and secondly, that I'd make damn sure that it wasn't going to be too quick and easy.
That being said, me being a university-student first and hobby-seamstress only second, I had to get some studying and exam-writing out of my way before I could get to sewing, but at least that gave me plenty of time to plan the project and think and rethink what materials I wanted to use how. Since this bag is going to be used mostly in/with our camping van and I had tons of fabric left over from sewing the curtains, I wanted to use the green-checkered fabric in some way. I thought about using it as a simple lining, but then thought a sturdier fabric might be better suited to withstand knife- and forkpoints. After rummaging through my (and my mother's) stash, I found a blue sturdy fabric of a surprisingly narrow width - I'd say about 80cm. No clue what my mother used it for, as it was still in one piece when I foun it o.O
Anyway, I'd seen and read some tutorials about piping and just love the way contrasting piping looks as a seamfinish, so the green-checkered cotton was going to be used as piping. On to the pictures!
Lots of biasstrips
Cutting biasstrips from checkered fabric is so easy that I got a bit carried away and cut a lot more than I actually needed. Which wouldn't be too bad if I also hadn't cut them so narrow that it's hard to use them for anything else than piping. Ah well, we live and learn :)
As I wanted my bag to be 50cm*50cm, I knew my piping had to be a little over 2m long. I sewed the three longest strips together, folded them in half and sewed in the cord using a zipper foot and moving the needle to the very left
Just keep piping, piping, piping...
(Stuck in my head right now.) I then sandwiched the green piping between the two blue layers (kinda tricky in the corners) and sewed around the square, using the zipperfoot and leaving a small opening so that I could turn the whole thing inside-out.
I think that's the first time I've sewn an entire project with a zipper-foot... :)
After turning it inside-out and ironing it, I cut the piping ends to match, leaving a little fabric to be folded over to hide the raw edges. Then I sewed the opening closed by hand using a combination of a whip- and a running stitch (only catching the blue fabric going out, not going in)
The easy way would have been to fold the thing up and sew the compartments in the same blue thread I used for handsewing. But that would have looked so boring. (Plus I was too lazy to thread the sewing machine with the blue thread and wind a new spool. Funny how laziness so often leads to more work rather than less, don't you think?)
As I said, I had cut way too many bias strips for the piping, so I decided to cut four strips to length, fold the edges to the middle, fold the ends under and sew them onto the bag. Did I mention that the strips were a little too narrow to be comfortably folded and pressed? No? Well, I didn't burn my fingers, but by the time I was done bending over the ironing board I felt like Quasimodo. Anyway, as it was almost two in the morning, I didn't take any pictures of the process, but I think the result speaks for itself:
Much prettier than mere stitching.
The ties were made by sewing two of the strips together and turning inside out. All in all, it's a very simple project that everyone who's ever had a beginner's sewing course has done in variations (I know I have) but it still makes me happy that such a simple thing can be made so pretty. As I said before: if I'm gonna do it, I might as well do it right ;)
Let's start with the sleeves. I meant for them to be in last weeks photoshoot, but they didn't go with the dress, so I meant to take some pictures of the finished sleeves on me, which didn't happen either because I have a cold and couldn't be bothered. Sorry. So, instead, you're getting pictures from when I worked on them.
Working on the sleeves
You can see where I reduced by four stitches at the ellbow
I knitted in rounds with yarn my mother bought a couple of years ago to make toques for my brothers, no idea why she bought so much of it.
Anyway, just the facts, ma'am:
The Challenge: #20, outerwear
Fabric: 2 balls of white yarn, I think it says polyacryl, but it feels nice and seems to be pretty warm
Pattern:none, just counting. Knitted in continuous rows
Year: ~1800
Notions: thinking about weaving some coloured ribbon through at both ends to tie some pretty bows, the colour would depend on the dress though, so I haven't put any in yet.
How historically accurate is it? Uh... although knitted sleeves did exist, they would have been done in much finer yarn with much smaller needles. Maybe as a gift by a little girl learning to knit to her older sister?
Hours to complete: Done while watching TV or DVD's, so maybe 3-4 hours per sleeve? I really should start counting these...
In my very first post, I talked about my very first selfmade dress, the yellow Regency dress. I drafted the pattern (not on my dressform, because it sucks, but I'll tell you about that later), figured out the closure and sewed the whole thing up; I even embroidered the bib front - only to realize that the bib was too small, there was no way to close that dress over my chest and wear it modestly, even if I had a shift and stays to go with it. So I had a dress I put a lot of work in and the only way to wear it would be for me to cut off the prettiest part that had also been the most time-consuming. Needless to say, I was very reluctant to do that and put it off, resulting in the dress sitting in a box in my closet for about a year.
At least it looks pretty on a hanger...
I recenty decided that that's just no way to treat your first big project and asked a friend of mine to come over and model it. Enter the Muse:
She made time in her busy schedule to help me show off my dress :)
I put her into the dress (yay, it fits :) ) and did her hair, which took a lot of curling and pinning and probably took longer than the actual photoshoot ;)
Then she got her accessories: an old necklace of my mother's that i pinned into her hair (I thought it just looked nice...), a cashmere scarf (also from my mother) and an antique fan made of ostrich feathers that belongs to - suprise - my mother as well (my aunt owns an antique-store, so my mother gets some very interesting birthday gifts from time to time). I also meant for her to wear the finished knitted sleeves, but they didn't go well with the dress, so I guess I'll have to take some "modern clothes" pictures of them. The shoes are the Muse's. We simply went into the garden to take some pictures, and I think it went pretty good, even though the Muse kept losing her scarf. (I find it amazing how the girl with two brothers loves to play dress-up so much that she modeled her skill-set around it while the girl with a sister needs to be taught how to sit down with a long skirt and a scarf without almost destroying her outfit ;) )
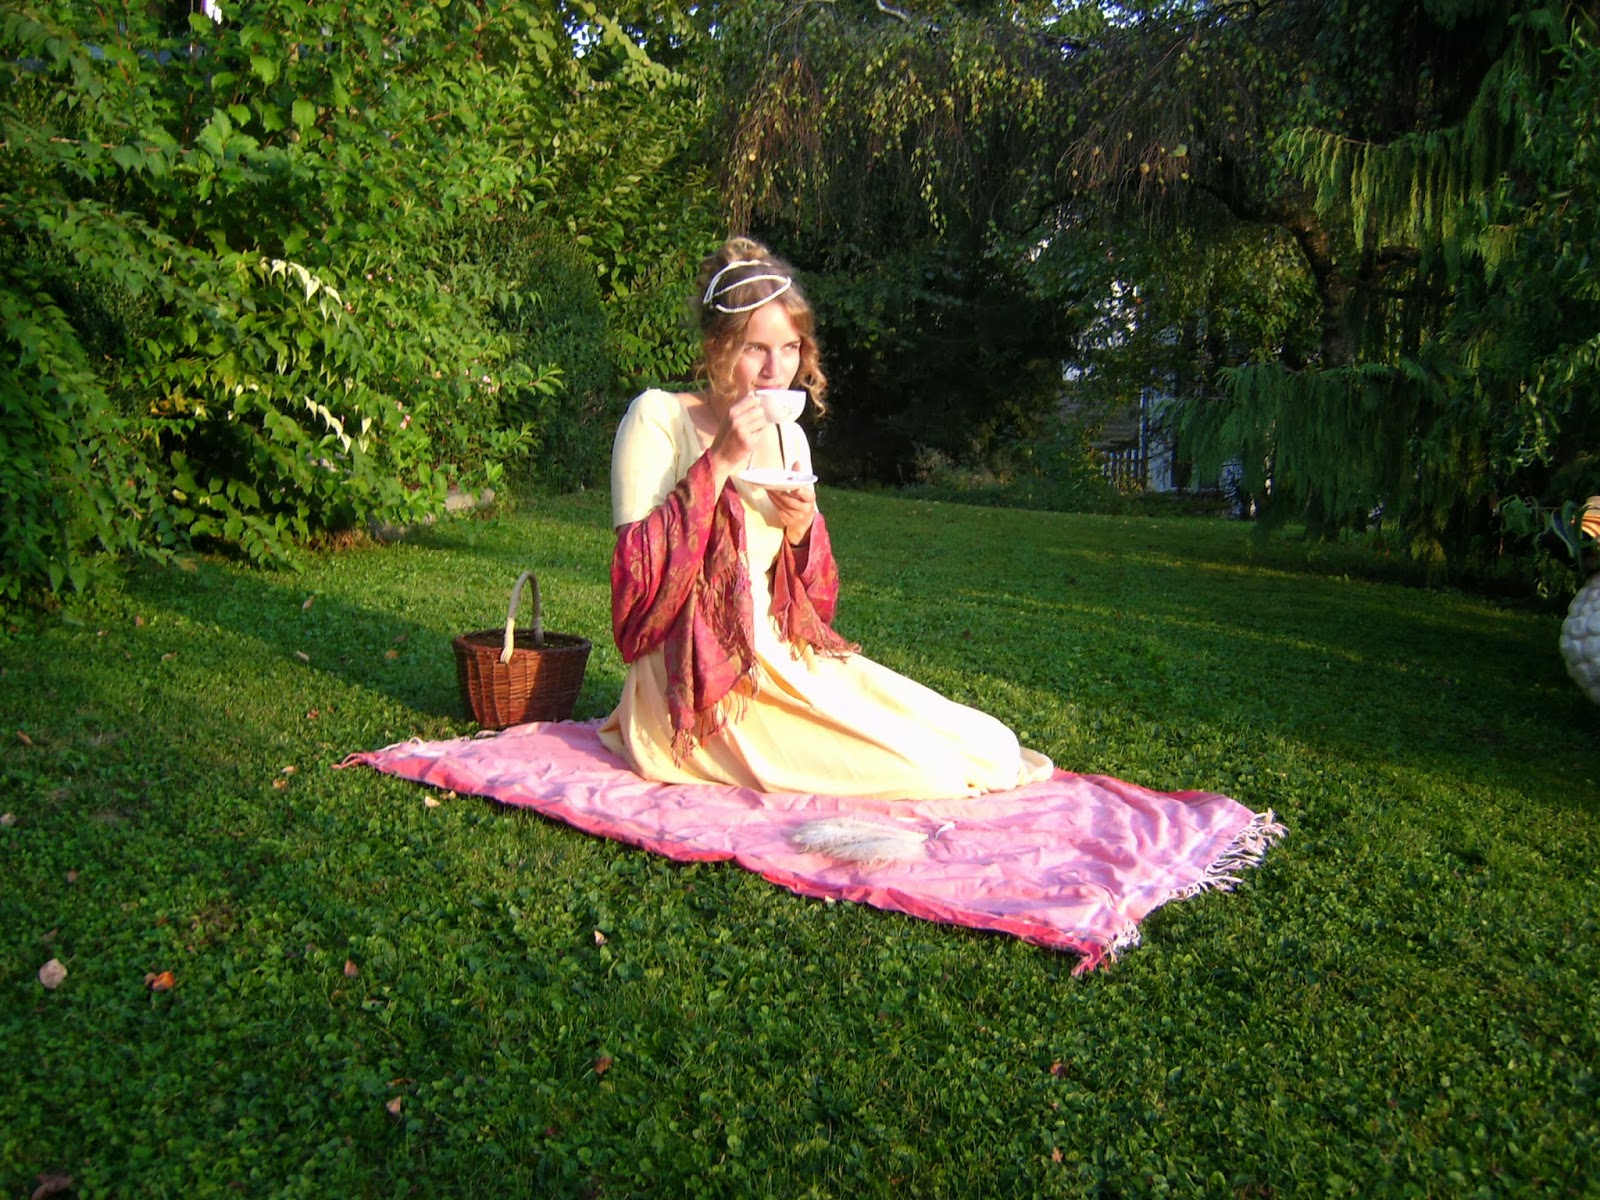
Anyway, I had fun, the Muse had fun (at least I hope so) and here are some pictures:
Picking Blackberries
Admiring the Plants
Drinking tea
Is that a blackbird?
I think this one is my favourite, though:
This and the first one. She's just the prettiest when she laughs, don't you think?
There's gonna be more Regency on this blog soon: in my next post I'll show you pictures of my finished sleeves plus the progress on my Regency stays. Remember those?